Navigation
- 120s PreSales: How to set up your Homeoffice?
- Why is it important?
- Key Components
- Lightning Setup
- Professional Video Background
- Step-by-Step Guide to Setting Up Your Home Office
- Camera Position
- Setup with one light
- Setup with two lights
- Setup with three lights
- Setup with full lights
- Setup with Greenscreen
- Examples of great Homeoffice Setups
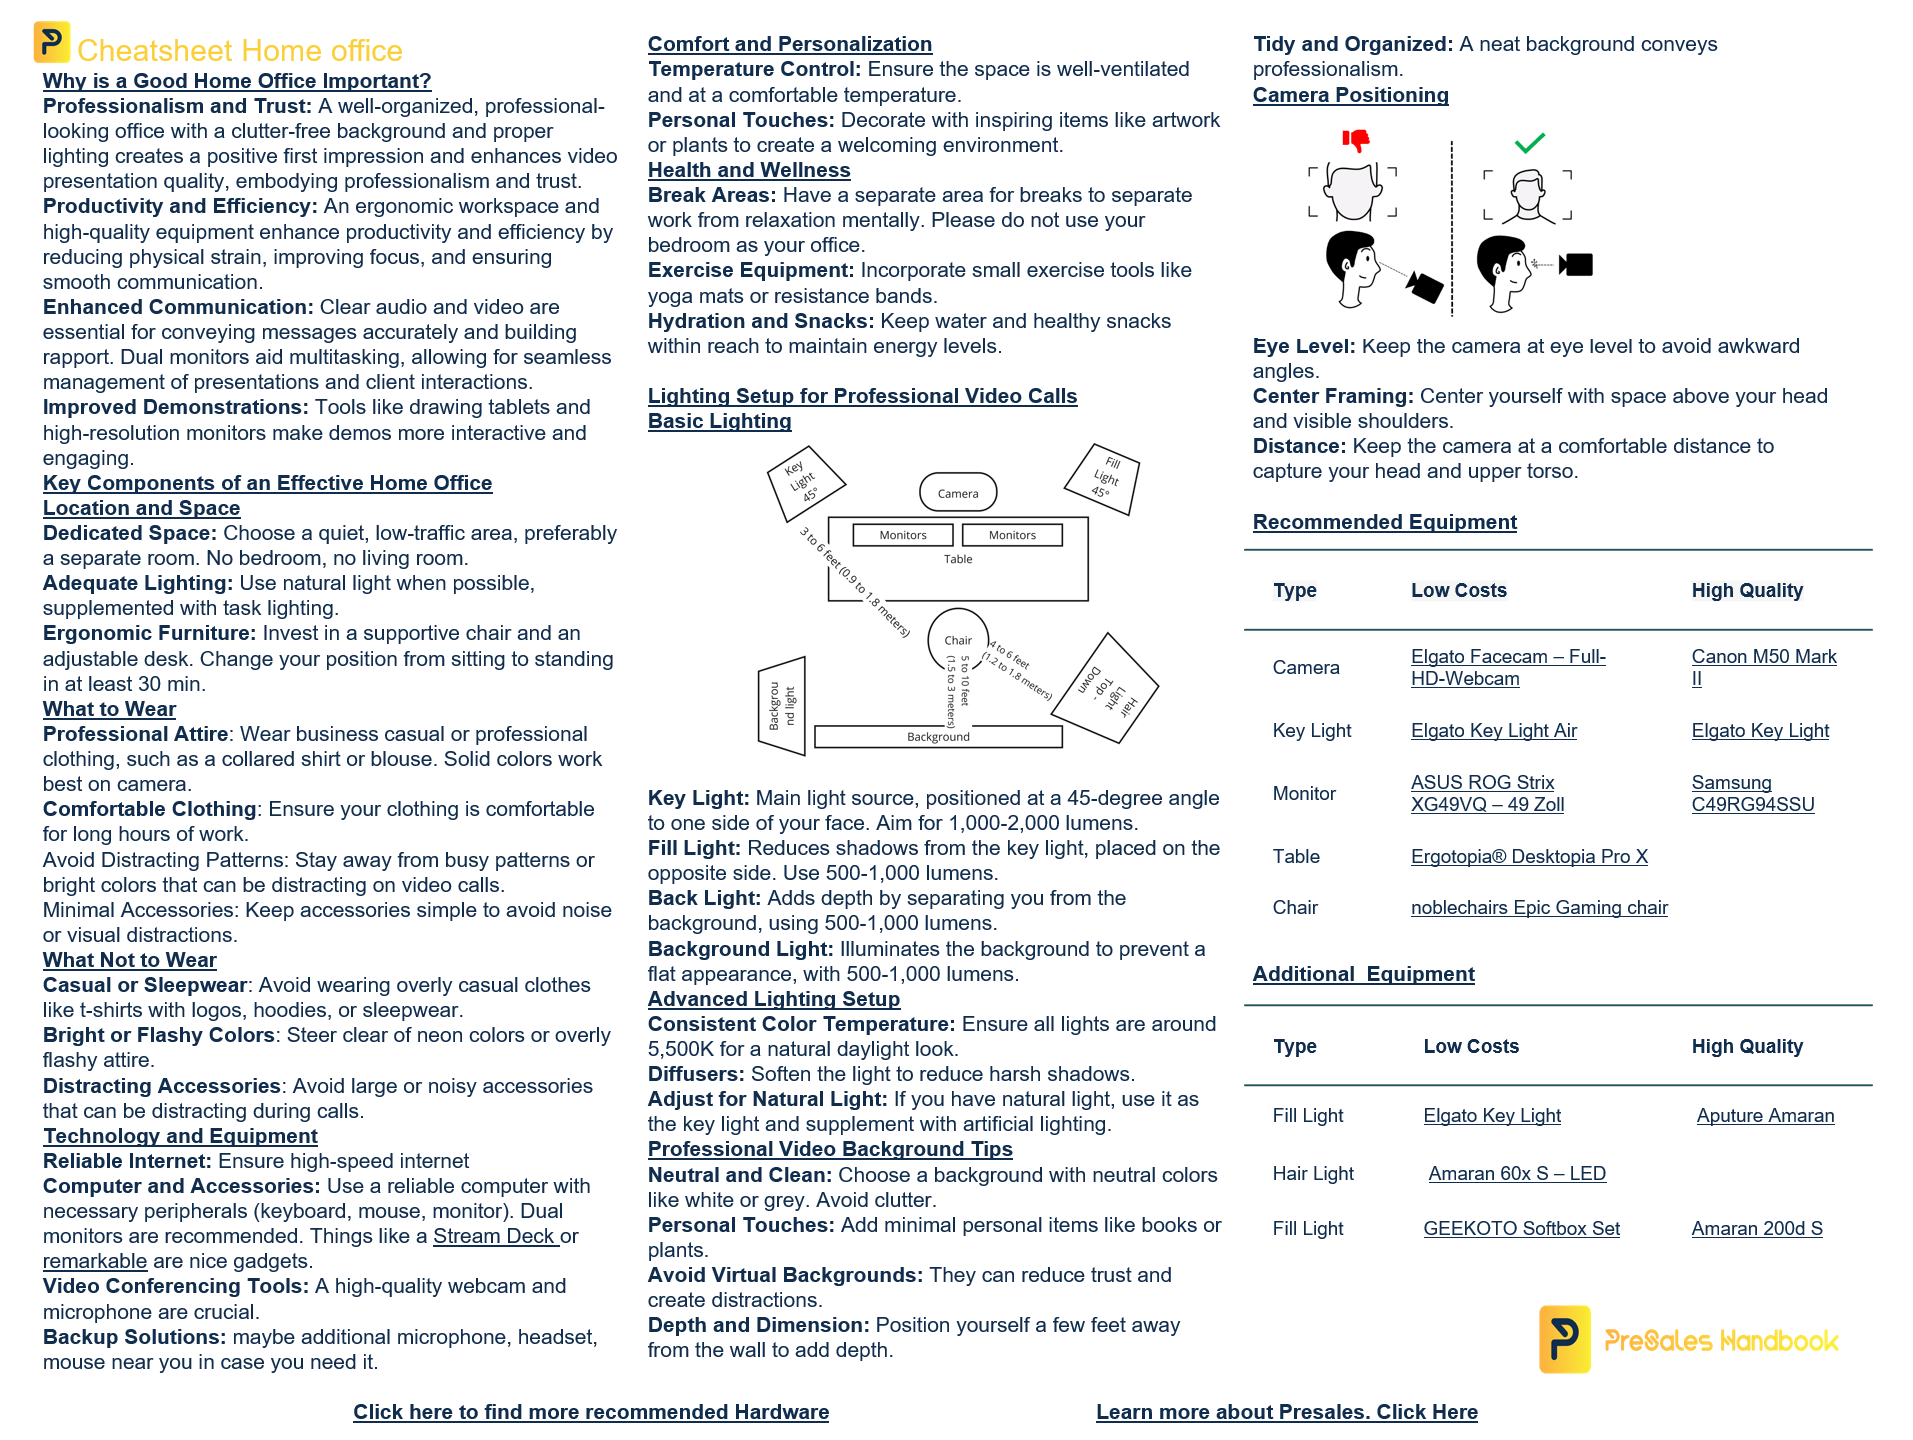
- Cheatsheet Home Office Setup
120s PreSales: How to set up your Homeoffice?
Why is it important?
A good home office setup is crucial for sales and presales professionals who now work and present primarily remotely.
Professionalism and Trust
First impressions matter, especially in remote settings. A well-organized and professional-looking home office conveys credibility and reliability to prospects and clients.
A clutter-free background and proper lighting can enhance the overall quality of video presentations, making them more engaging and effective.
Productivity and Efficiency
A comfortable and ergonomic workspace helps maintain focus and reduces physical strain, leading to higher productivity and longer periods of effective work.
High-quality equipment, such as a good webcam, microphone, and reliable internet connection, ensures smooth and uninterrupted communication, preventing technical issues that could derail presentations.
Enhanced Communication
Clear audio and video are essential for effective communication. A good microphone and camera ensure that your voice and expressions are conveyed accurately, making it easier to build rapport and convey your message.
Tools like dual monitors can facilitate better multitasking during calls, allowing you to manage presentations, notes, and client interactions more seamlessly.
Improved Demonstrations and Demos
Delivering compelling product demonstrations is a key part of the role of presales professionals. A good home office setup can include tools like a drawing tablet, high-resolution monitors, and specialized software to create more interactive and engaging demos.
Being able to switch between different types of content smoothly (e.g., slides, live demos, videos) enhances the overall impact of your presentations.
Key Components
Setting up a home office is crucial for optimizing productivity, comfort, and work-life balance, especially in a remote working environment.
Here are key components and considerations for an effective home office setup:
Location and Space
Choose a Dedicated Space: To minimize distractions, select a quiet, low-traffic area. Ideally, this should be a separate room, but a well-defined corner can also work.
Adequate Lighting: Ensure the space is well-lit. Natural light is ideal, supplemented by task lighting to reduce eye strain.
Ergonomic Furniture: Invest in a comfortable chair and a desk at the correct height. An ergonomic chair supports good posture, which can prevent back and neck pain.
Technology and Equipment
Reliable Internet Connection: High-speed internet is essential for video conferencing, large file transfers, and other work-related activities.
Computer and Accessories: A reliable computer (desktop or laptop) with necessary accessories like a keyboard, mouse, and monitor. Consider dual monitors for increased productivity.
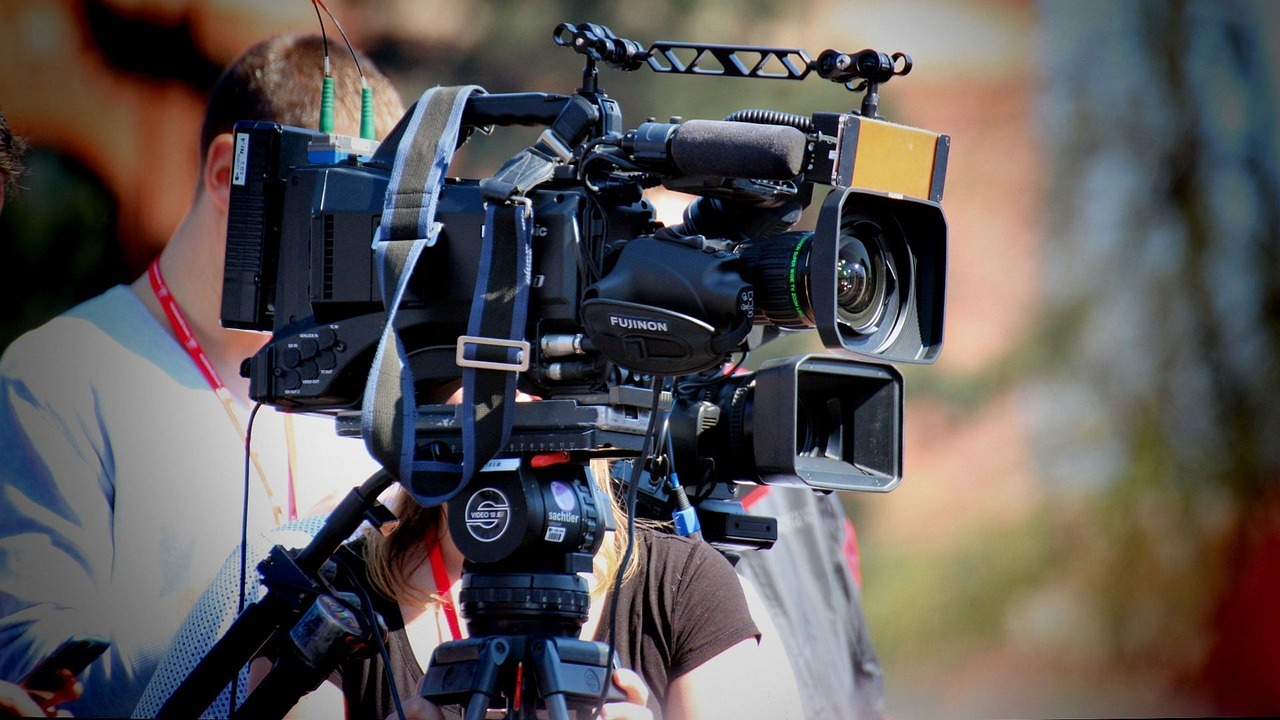
Video Conferencing Tools: A high-quality webcam and microphone for clear communication during virtual meetings.
Backup Solutions: External hard drives or cloud storage solutions to regularly back up important data.
Organization and Storage
Desk Organization: Keep your desk clutter-free. Use organizers, trays, and holders for stationary and documents.
Filing System: Set up a filing system (physical and digital) to keep important documents organized and easily accessible.
Shelving and Cabinets: Use shelves and cabinets to store books, files, and office supplies.
Comfort and Personalization
Temperature Control: Ensure the room is well-ventilated and has a comfortable temperature.
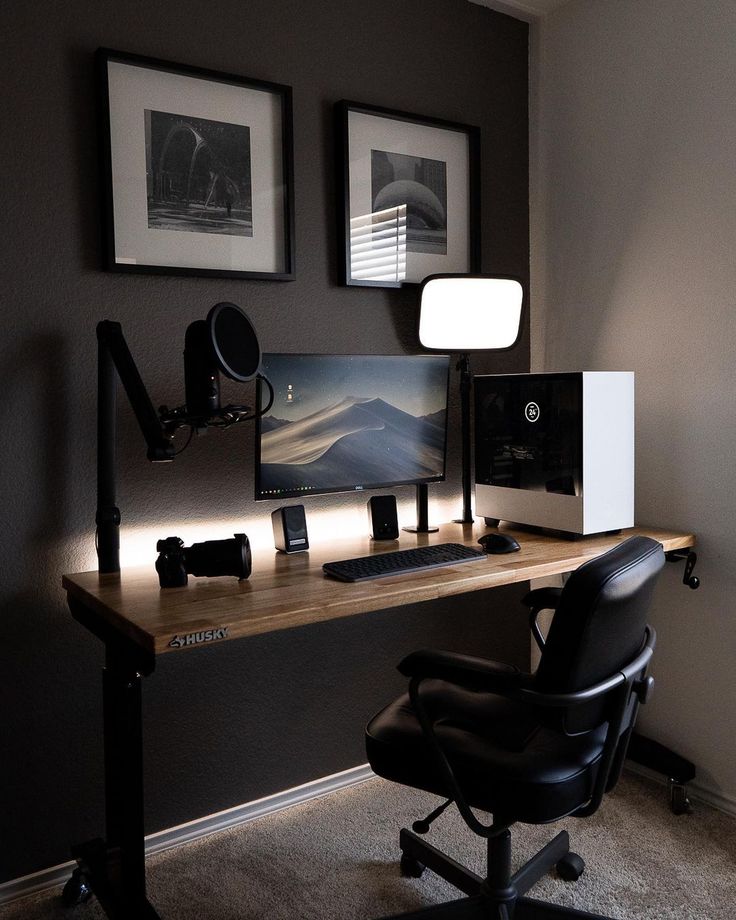
Personal Touches: Decorate the space with items that inspire you, such as artwork, plants, or family photos. This makes the space more inviting and can boost morale.
Health and Wellness
Break Areas: Designate a separate area for breaks to separate work from relaxation mentally. Do not combine your bedroom and your work space.
Exercise Equipment: To incorporate movement into your day, consider small exercise equipment like a yoga mat or resistance bands.
Hydration and Snacks: Keep water and healthy snacks within reach to maintain energy levels throughout the day.
Lightning Setup
For recording videos or livestreaming, the right lighting setup is crucial to achieving a professional look. Here is a simple guide on how to set up your lighting from a lumen and light perspective:
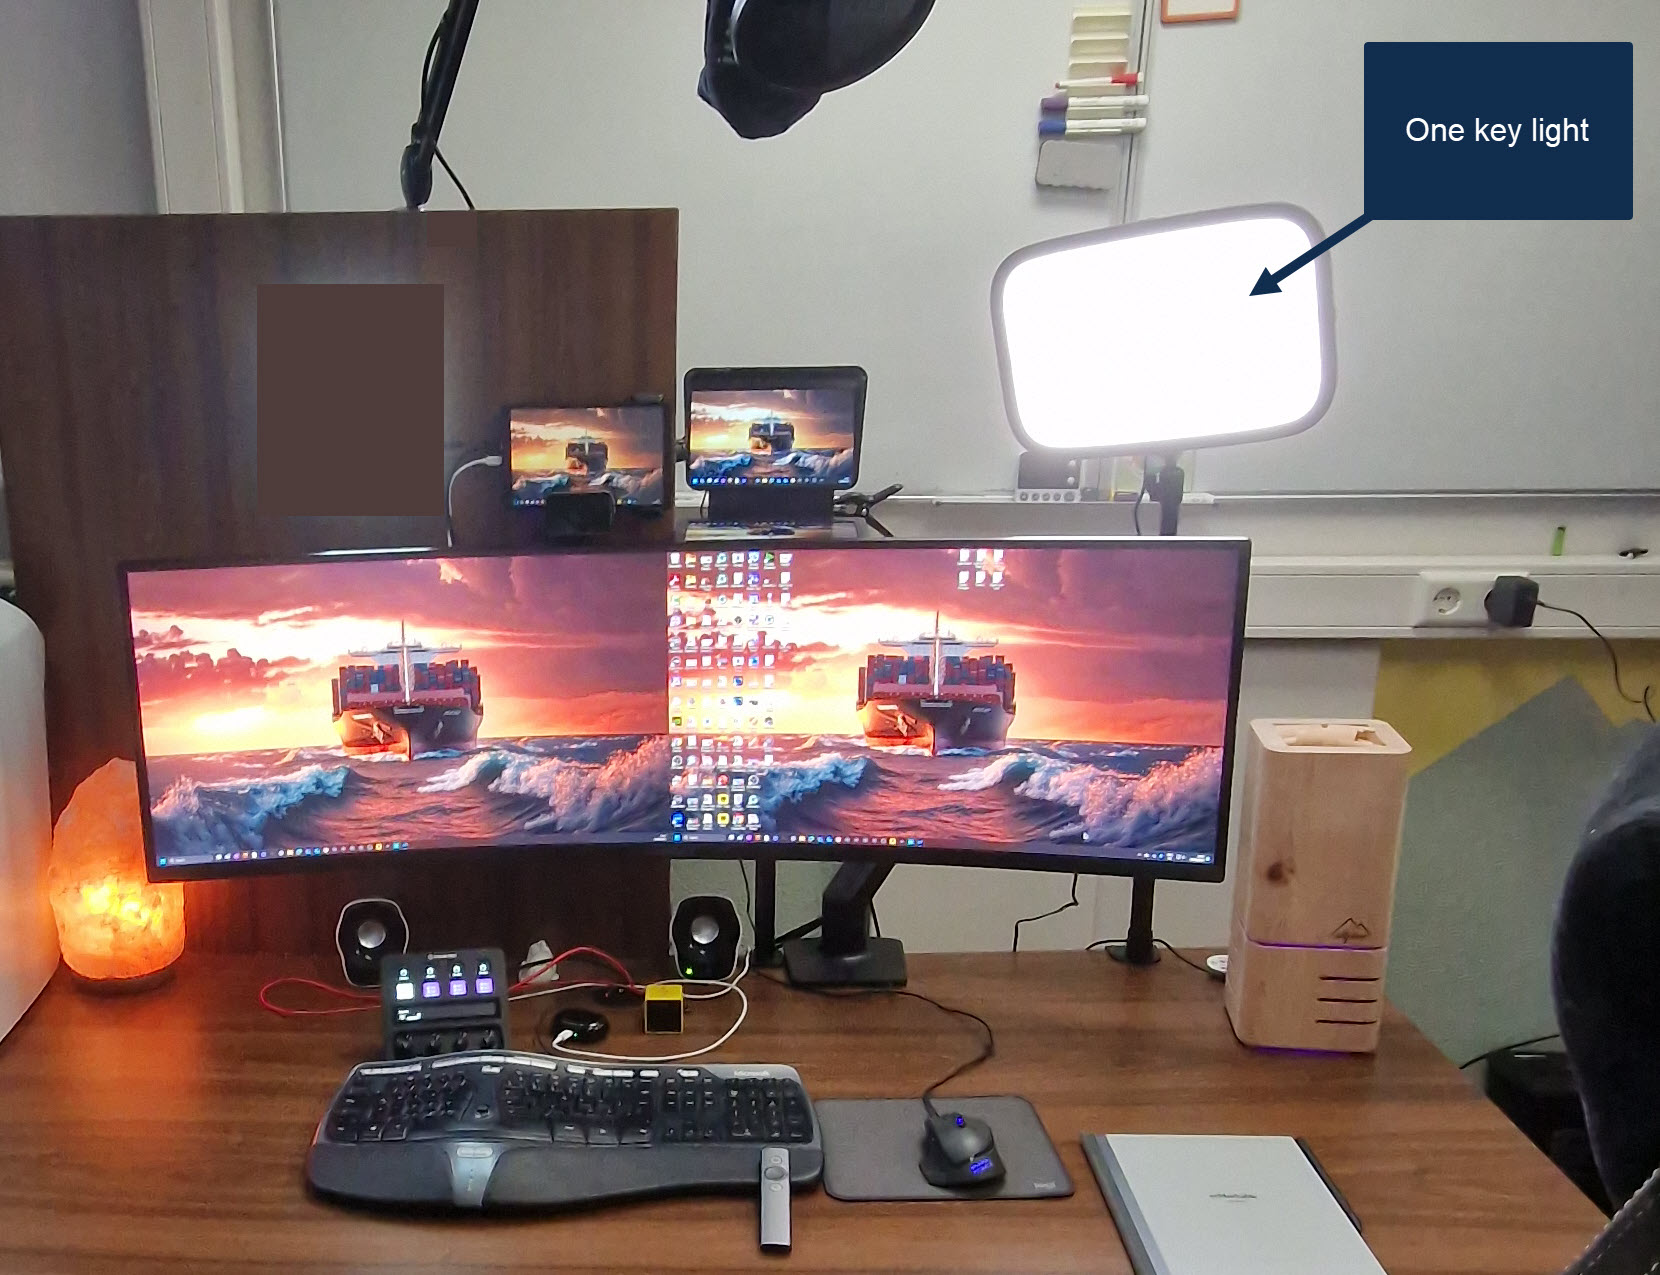
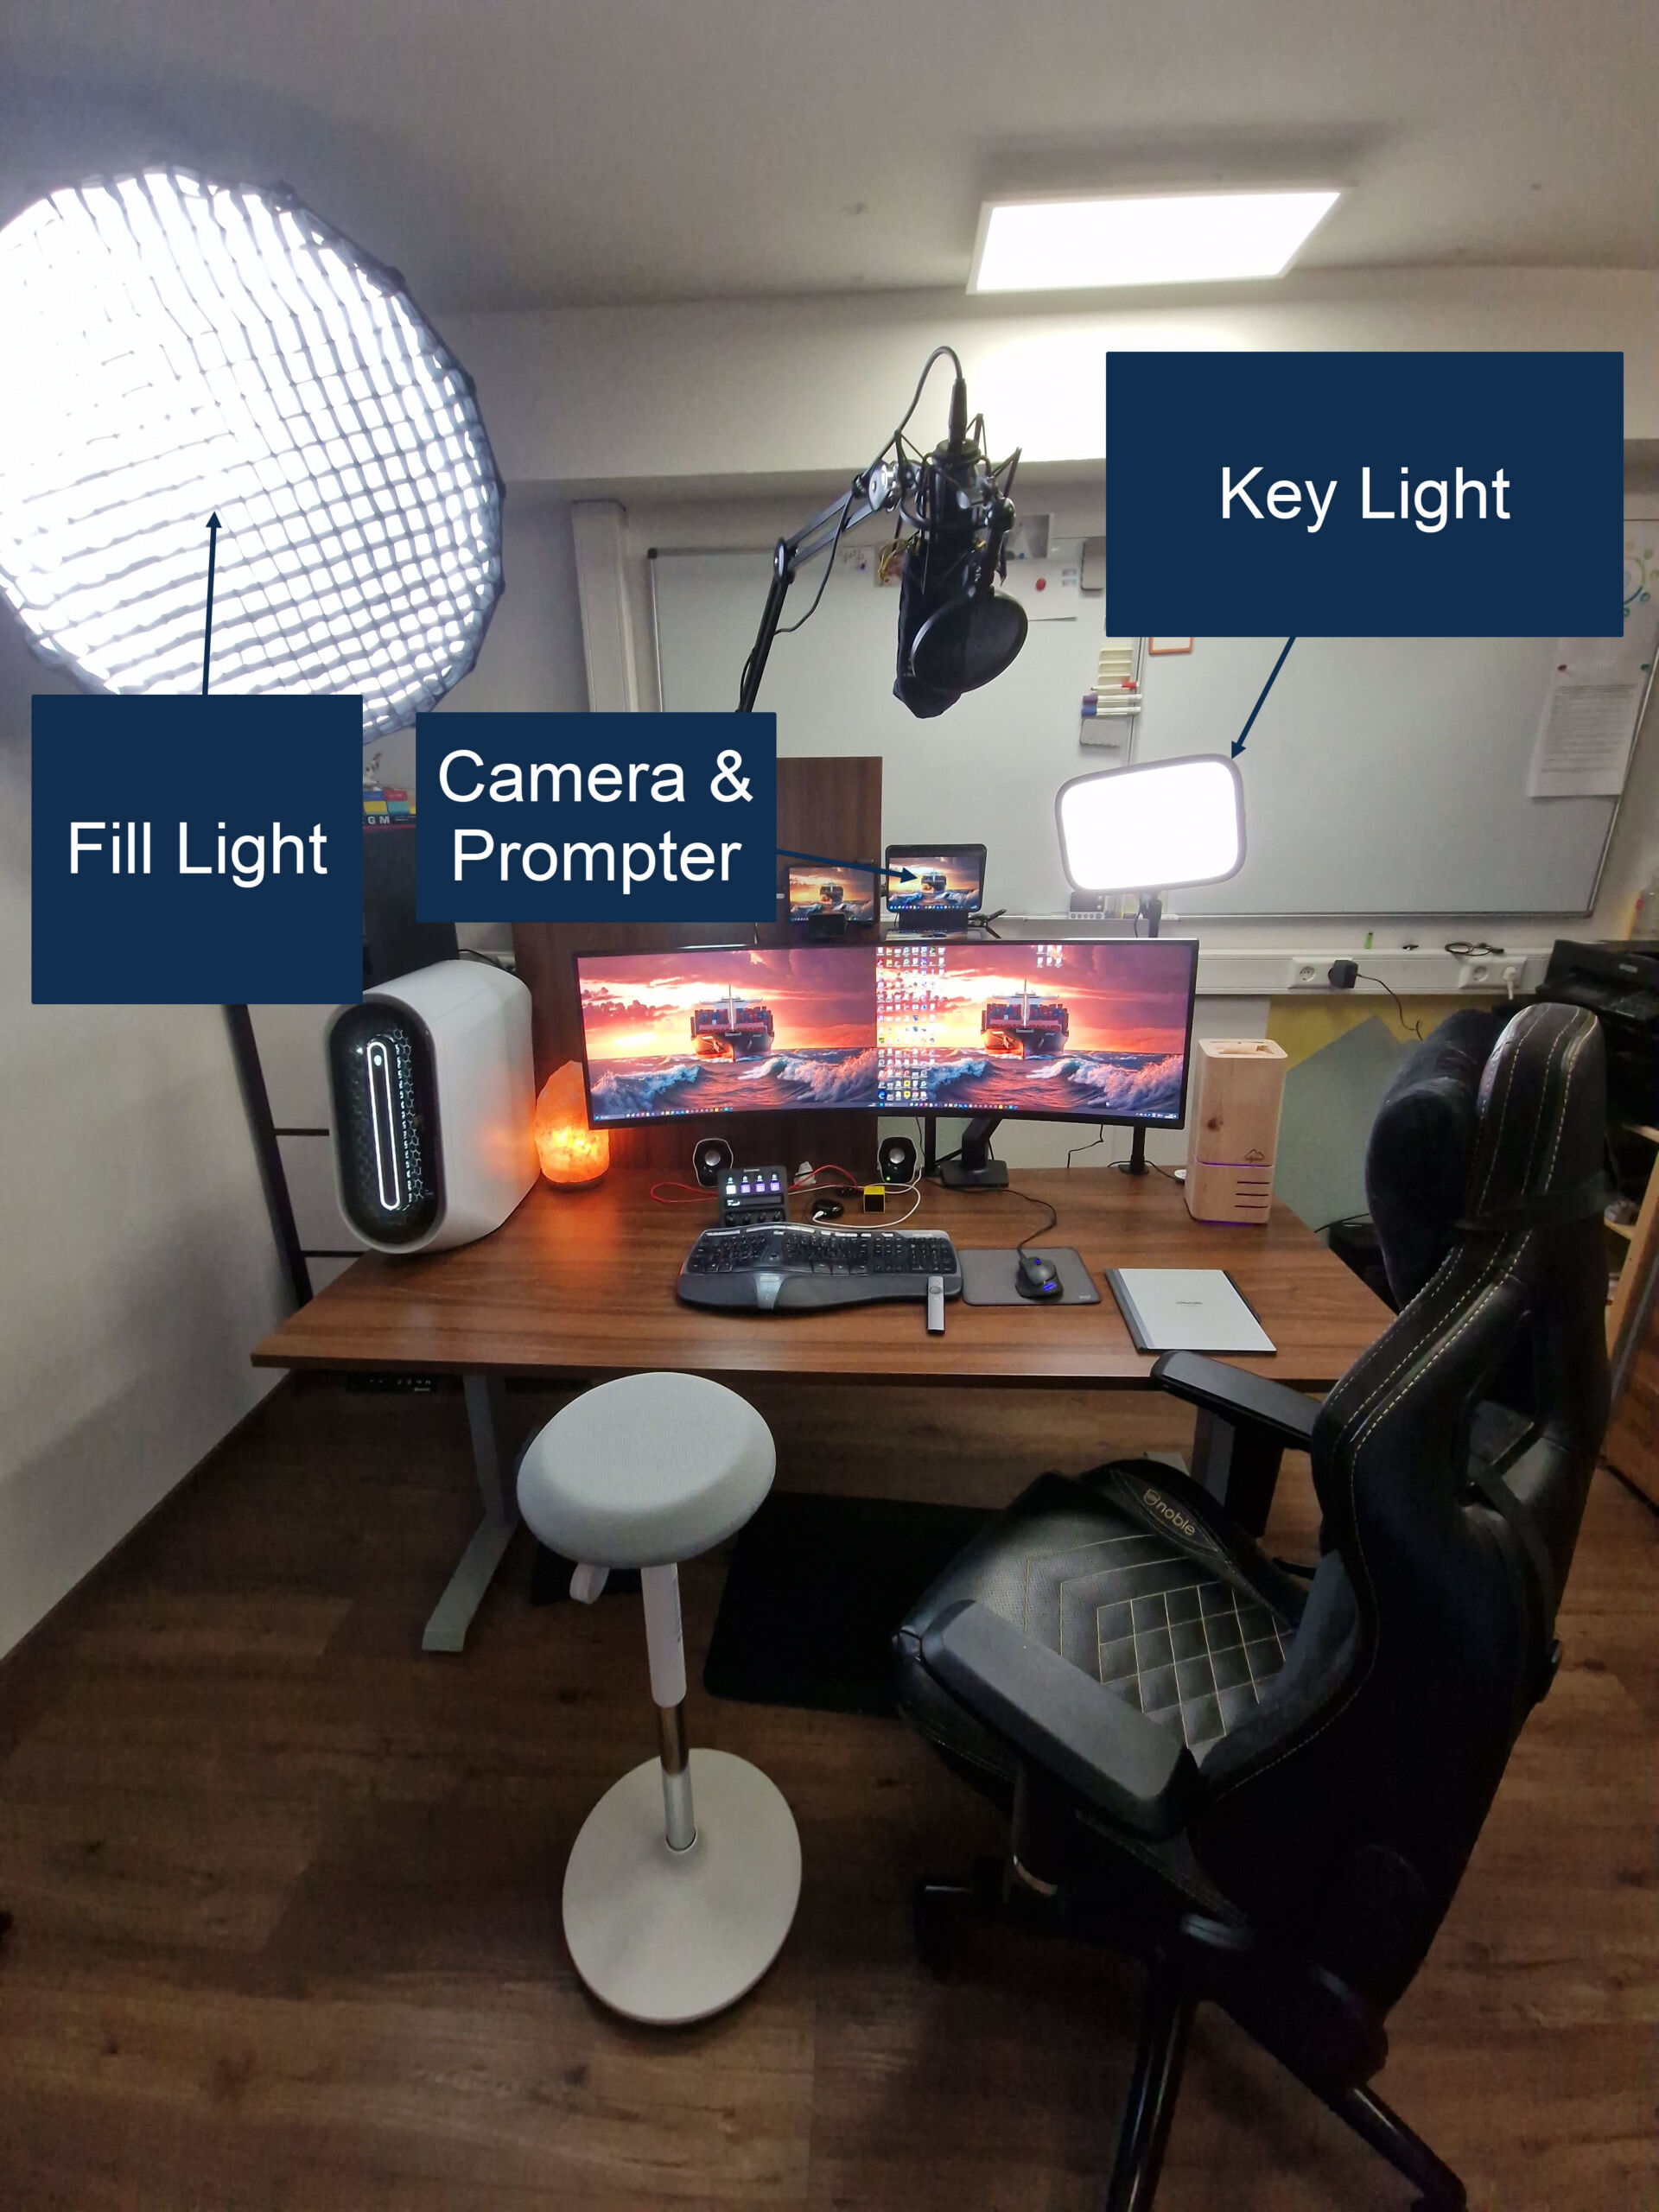
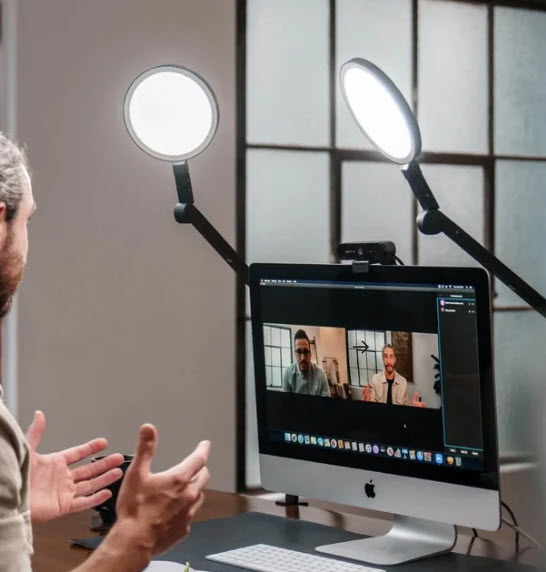
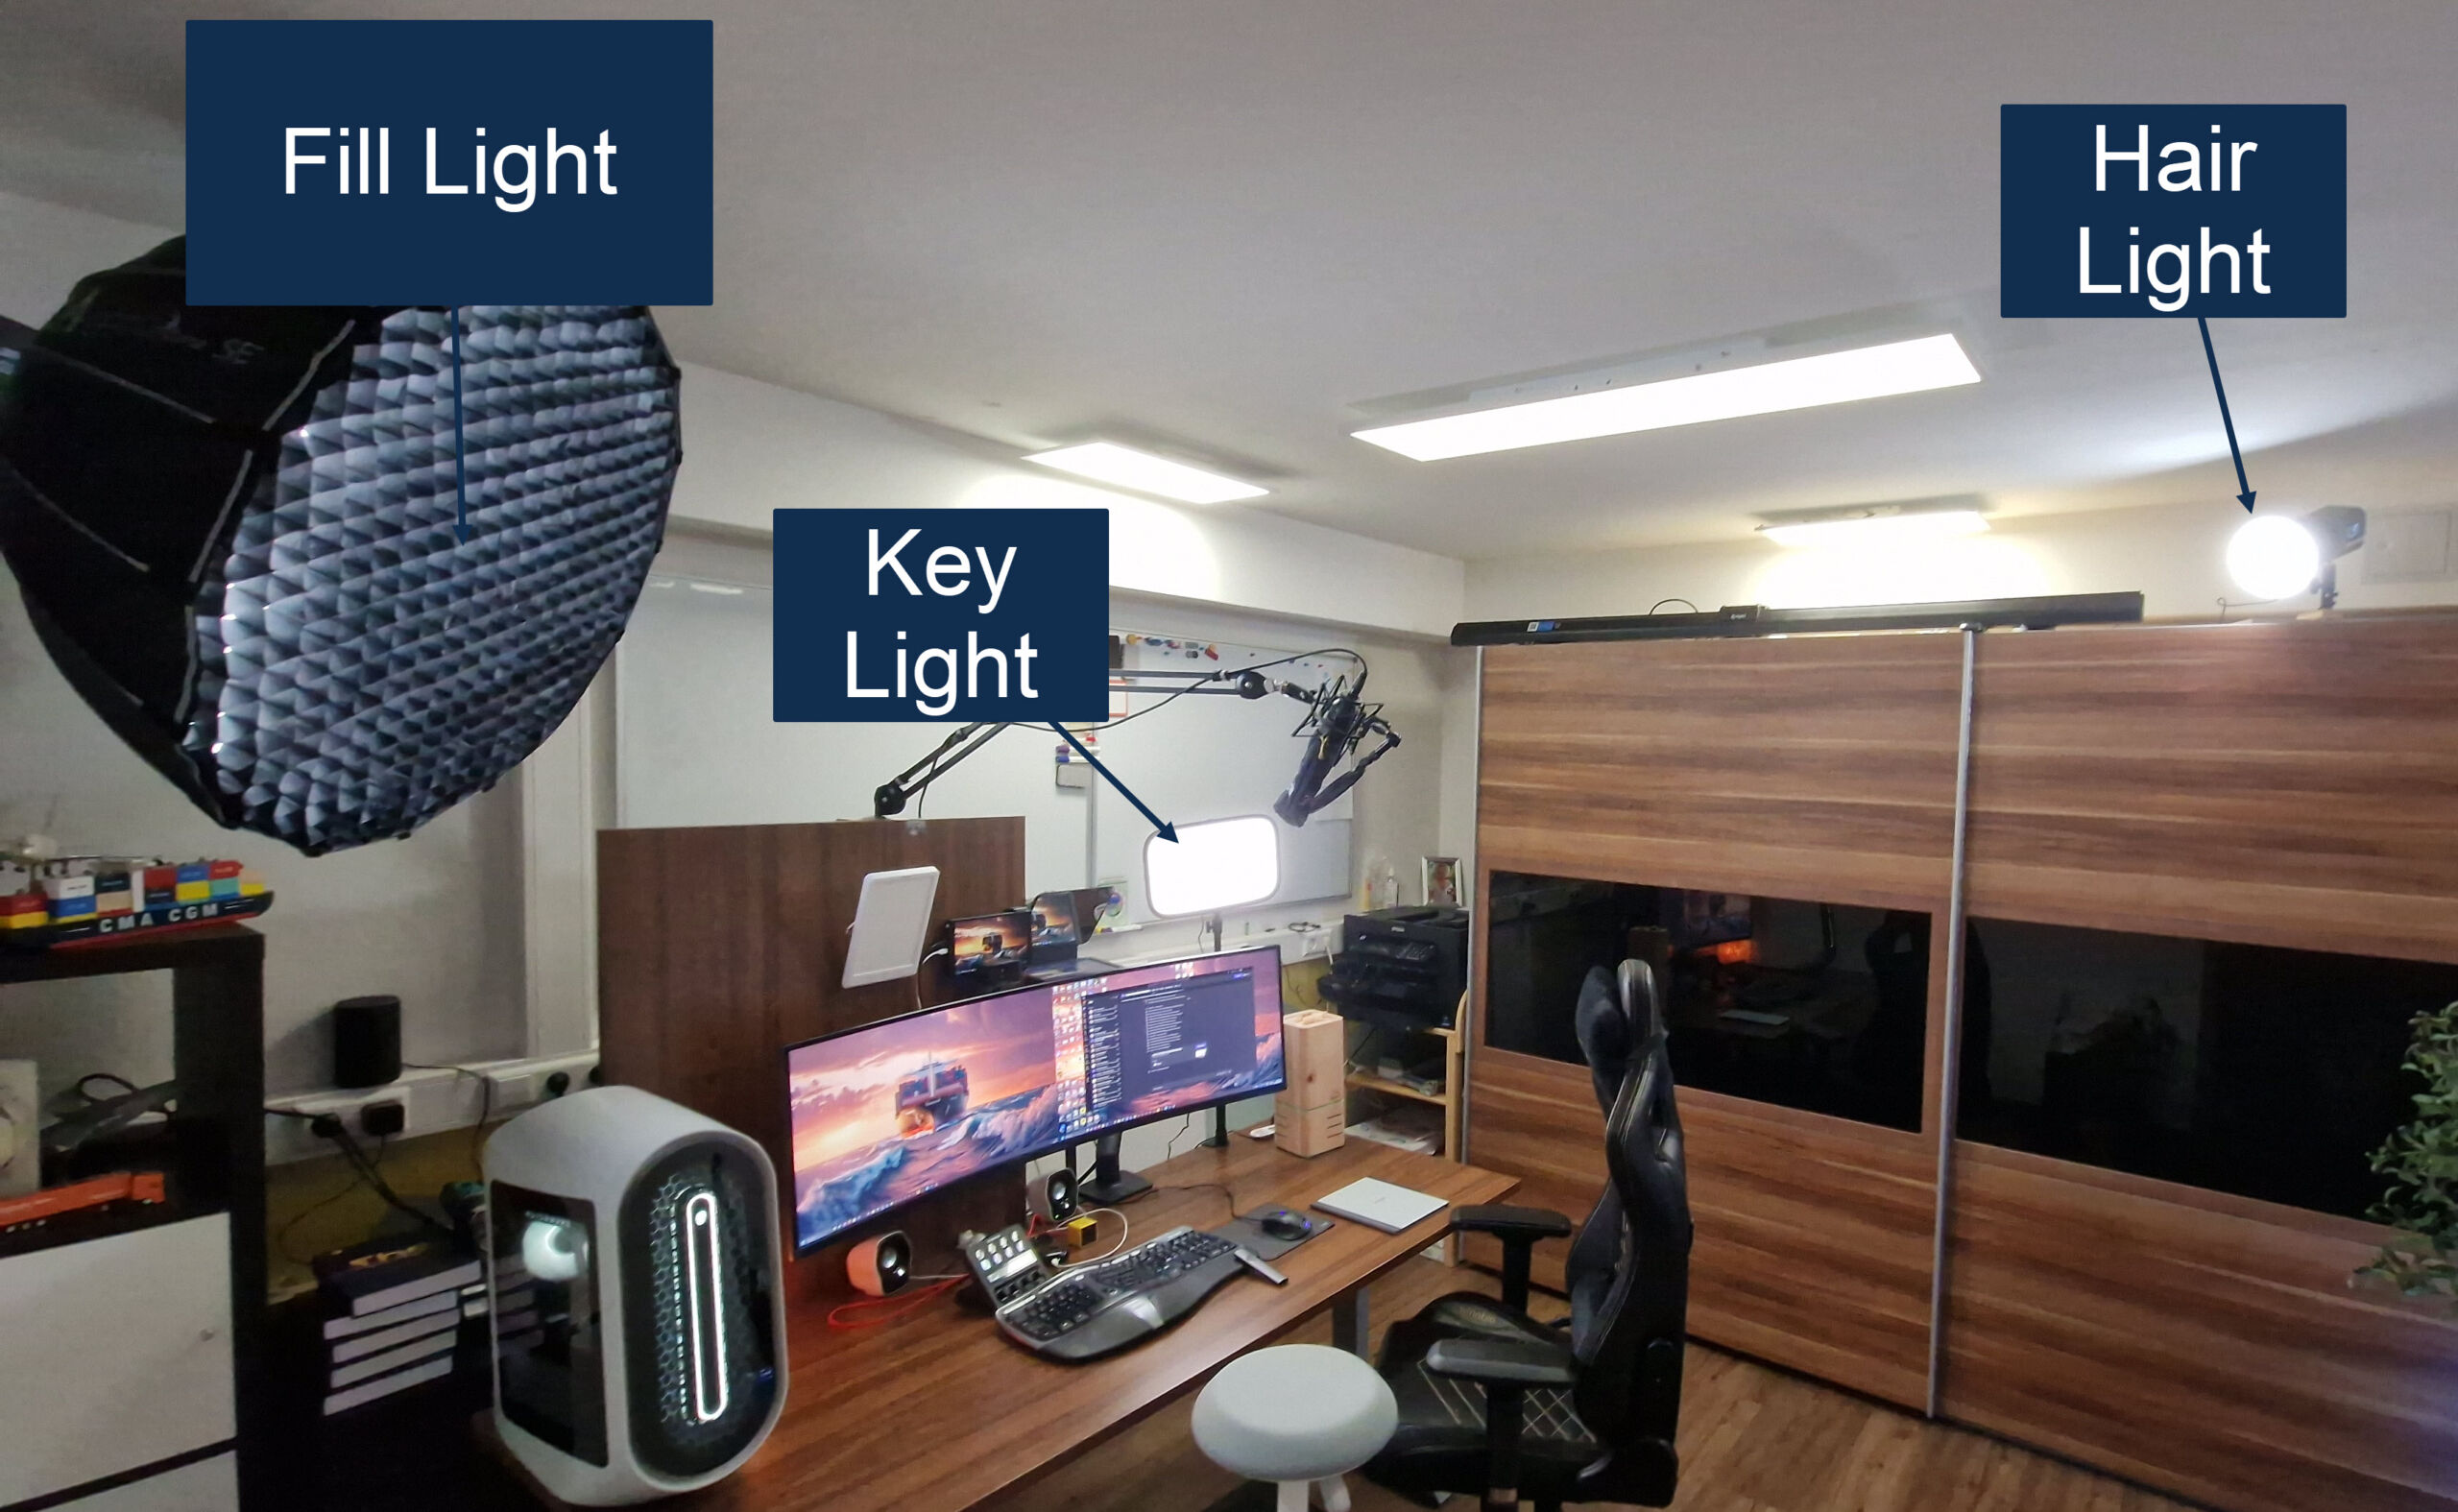
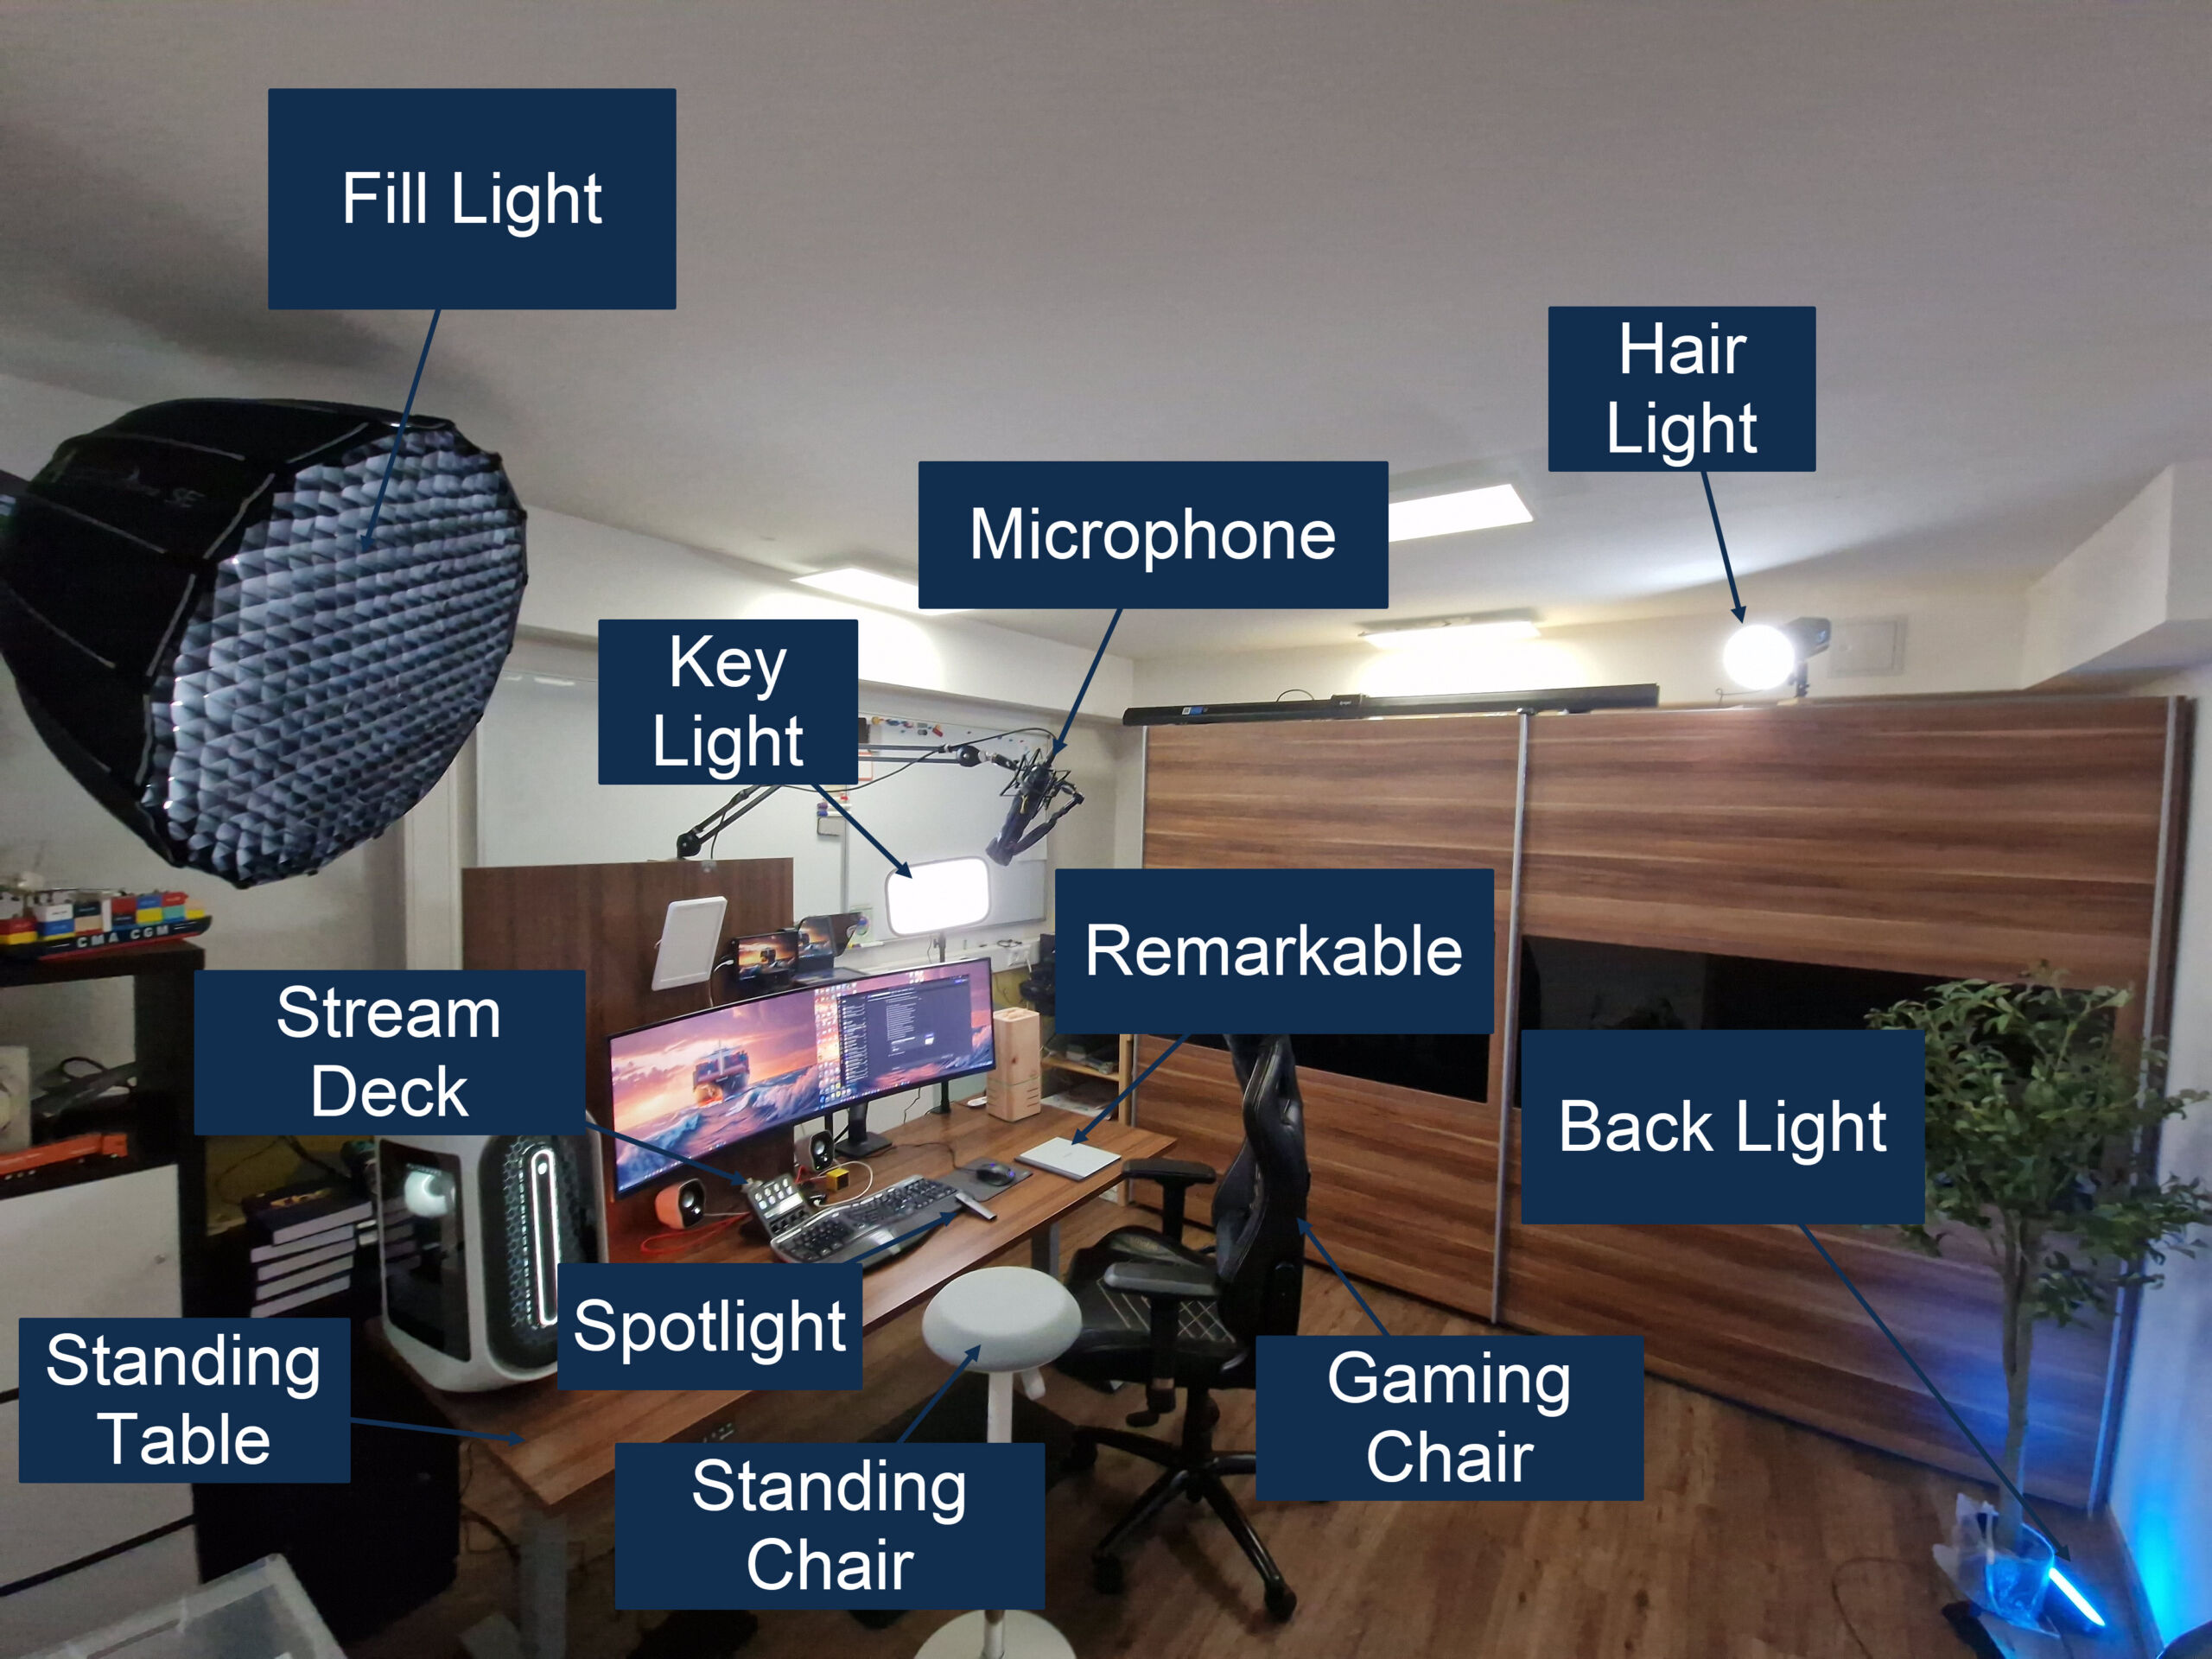
Key Light: This is the main light source and should be the brightest. Use a softbox or LED panel with adjustable brightness. Aim for 1,000 to 2,000 lumens for indoor recordings. Position it at a 45-degree angle from your face to create a flattering light with soft shadows.
Fill Light: This light reduces shadows created by the key light. It should be less bright, around 500 to 1,000 lumens. Place it on the opposite side of the key light at a similar angle but at a lower intensity.
Back Light (or Hair Light): This light separates you from the background, adding depth. A small LED light with 500 to 1,000 lumens works well. Position it behind you, aimed at your head and shoulders.
Background Light: To illuminate the background, use another light source with 500 to 1,000 lumens. This prevents the background from looking too dark or flat.
Adjusting for Natural Light: If you have natural light, use it to your advantage. Position yourself facing the window to use the daylight as your key light. Supplement with artificial lights as needed.
Diffusers: Use diffusers or softboxes on all your lights to soften the light and reduce harsh shadows.
Colour Temperature: Ensure all lights are at the same colour temperature, ideally around 5,500K, for a natural daylight look.
Professional Video Background
A professional background enhances the credibility of your video recordings. Here are some tips on setting up an ideal background:
Avoid Virtual Backgrounds: While virtual backgrounds can be tempting, they can reduce trust as people might think you are hiding something. They also often create visual artefacts that can be distracting.
Neutral and Clean Background: Use a clean, uncluttered background. Neutral colours like white, grey, or soft pastels work best and do not distract from the speaker.
Personal Touches: Add a few personal items, such as books, plants, or artwork, to make the space feel warm and personal, but avoid clutter.
Consistent Branding: If applicable, include subtle branding elements like a company logo or colours that match your brand.
Depth and Dimension: To avoid a flat look, ensure there is some depth between you and the background. You can achieve this by positioning your desk a few feet away from the wall.
Avoid Reflective Surfaces: Reflective surfaces can cause unwanted glare and distractions. Ensure the background materials are matte or non-reflective.
Tidy and Organized: Keep your background tidy. An organized space conveys professionalism and attention to detail.
Step-by-Step Guide to Setting Up Your Home Office
Setting up a home office involves careful planning to create a space that enhances productivity and comfort. Follow these steps to set up an efficient and professional home office.
- Choose the Location
- Select a Quiet Area: Choose a location in your home that is quiet and away from high-traffic areas to minimize distractions.
- Natural Light: Preferably select a space with natural light to reduce eye strain and improve mood.
- Space Requirements: Ensure the space is large enough to accommodate your desk, chair, and other necessary equipment.
- Furnish the Space
- Desk: Choose a desk that fits your space and meets your work needs. Ensure it’s large enough to hold your computer, monitor, and other essentials.
- Ergonomic Chair: Invest in an ergonomic chair that provides good lumbar support to prevent back pain.
- Storage Solutions: Add shelves, cabinets, or drawers to neatly store books, files, and office supplies.
- Organize Your Work Area
- Desk Setup: Arrange your desk to keep essential items within reach and maintain a clutter-free workspace.
- Cable Management: Use cable organizers to keep cords and cables tidy and out of the way.
- Filing System: Set up a filing system for important documents. Use both physical files and digital storage solutions.
- Technology and Equipment
- Computer and Peripherals: Set up your computer, keyboard, mouse, and monitor. Consider using dual monitors for increased productivity.
- High-Speed Internet: Ensure you have a reliable and fast internet connection to support video conferencing and large file transfers.
- Backup Solutions: Use external hard drives or cloud storage to back up important data regularly.
- Video Conferencing Setup
- Webcam and Microphone: Use a high-quality webcam and microphone for clear communication during virtual meetings.
- Lighting: Set up proper lighting for video calls.
- Professional Background Setup
- Neutral and Clean Background: Choose a neutral, uncluttered background. Soft colours like white or grey work best.
- Personal Touches: Add minimal personal items like books, plants, or artwork to make the space inviting without being distracting.
- Avoid Virtual Backgrounds: Use a real background to avoid distractions and build trust.
- Depth and Dimension: Position your desk a few feet away from the wall to create depth.
- Avoid Reflective Surfaces: Use non-reflective materials to prevent glare.
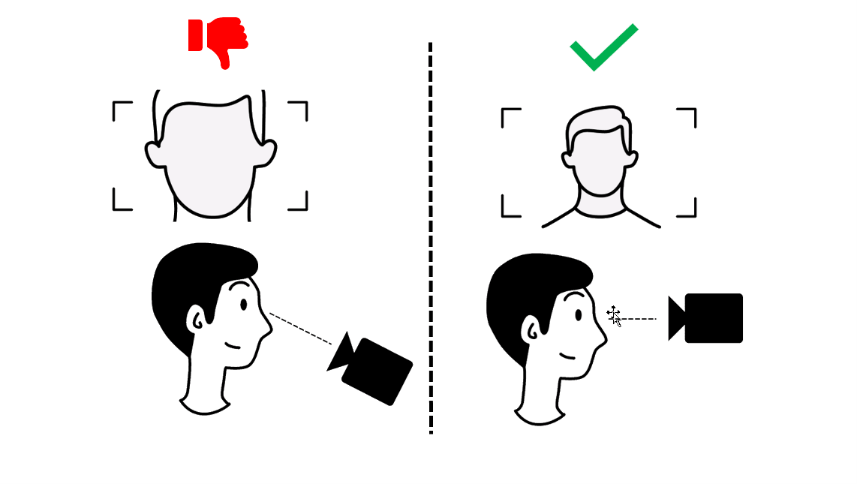
Camera Position
Eye Level: Position the camera at your eye level. This prevents viewers from looking up at you (which can be intimidating) or down at you (which can feel condescending).
Center Framing: Center yourself in the frame with a bit of space above your head and your shoulders visible. This provides a balanced and professional appearance.
Distance: Keep the camera at a comfortable distance, so your head and upper torso are visible. This allows for natural gestures without being too close or too far
Setup with one light
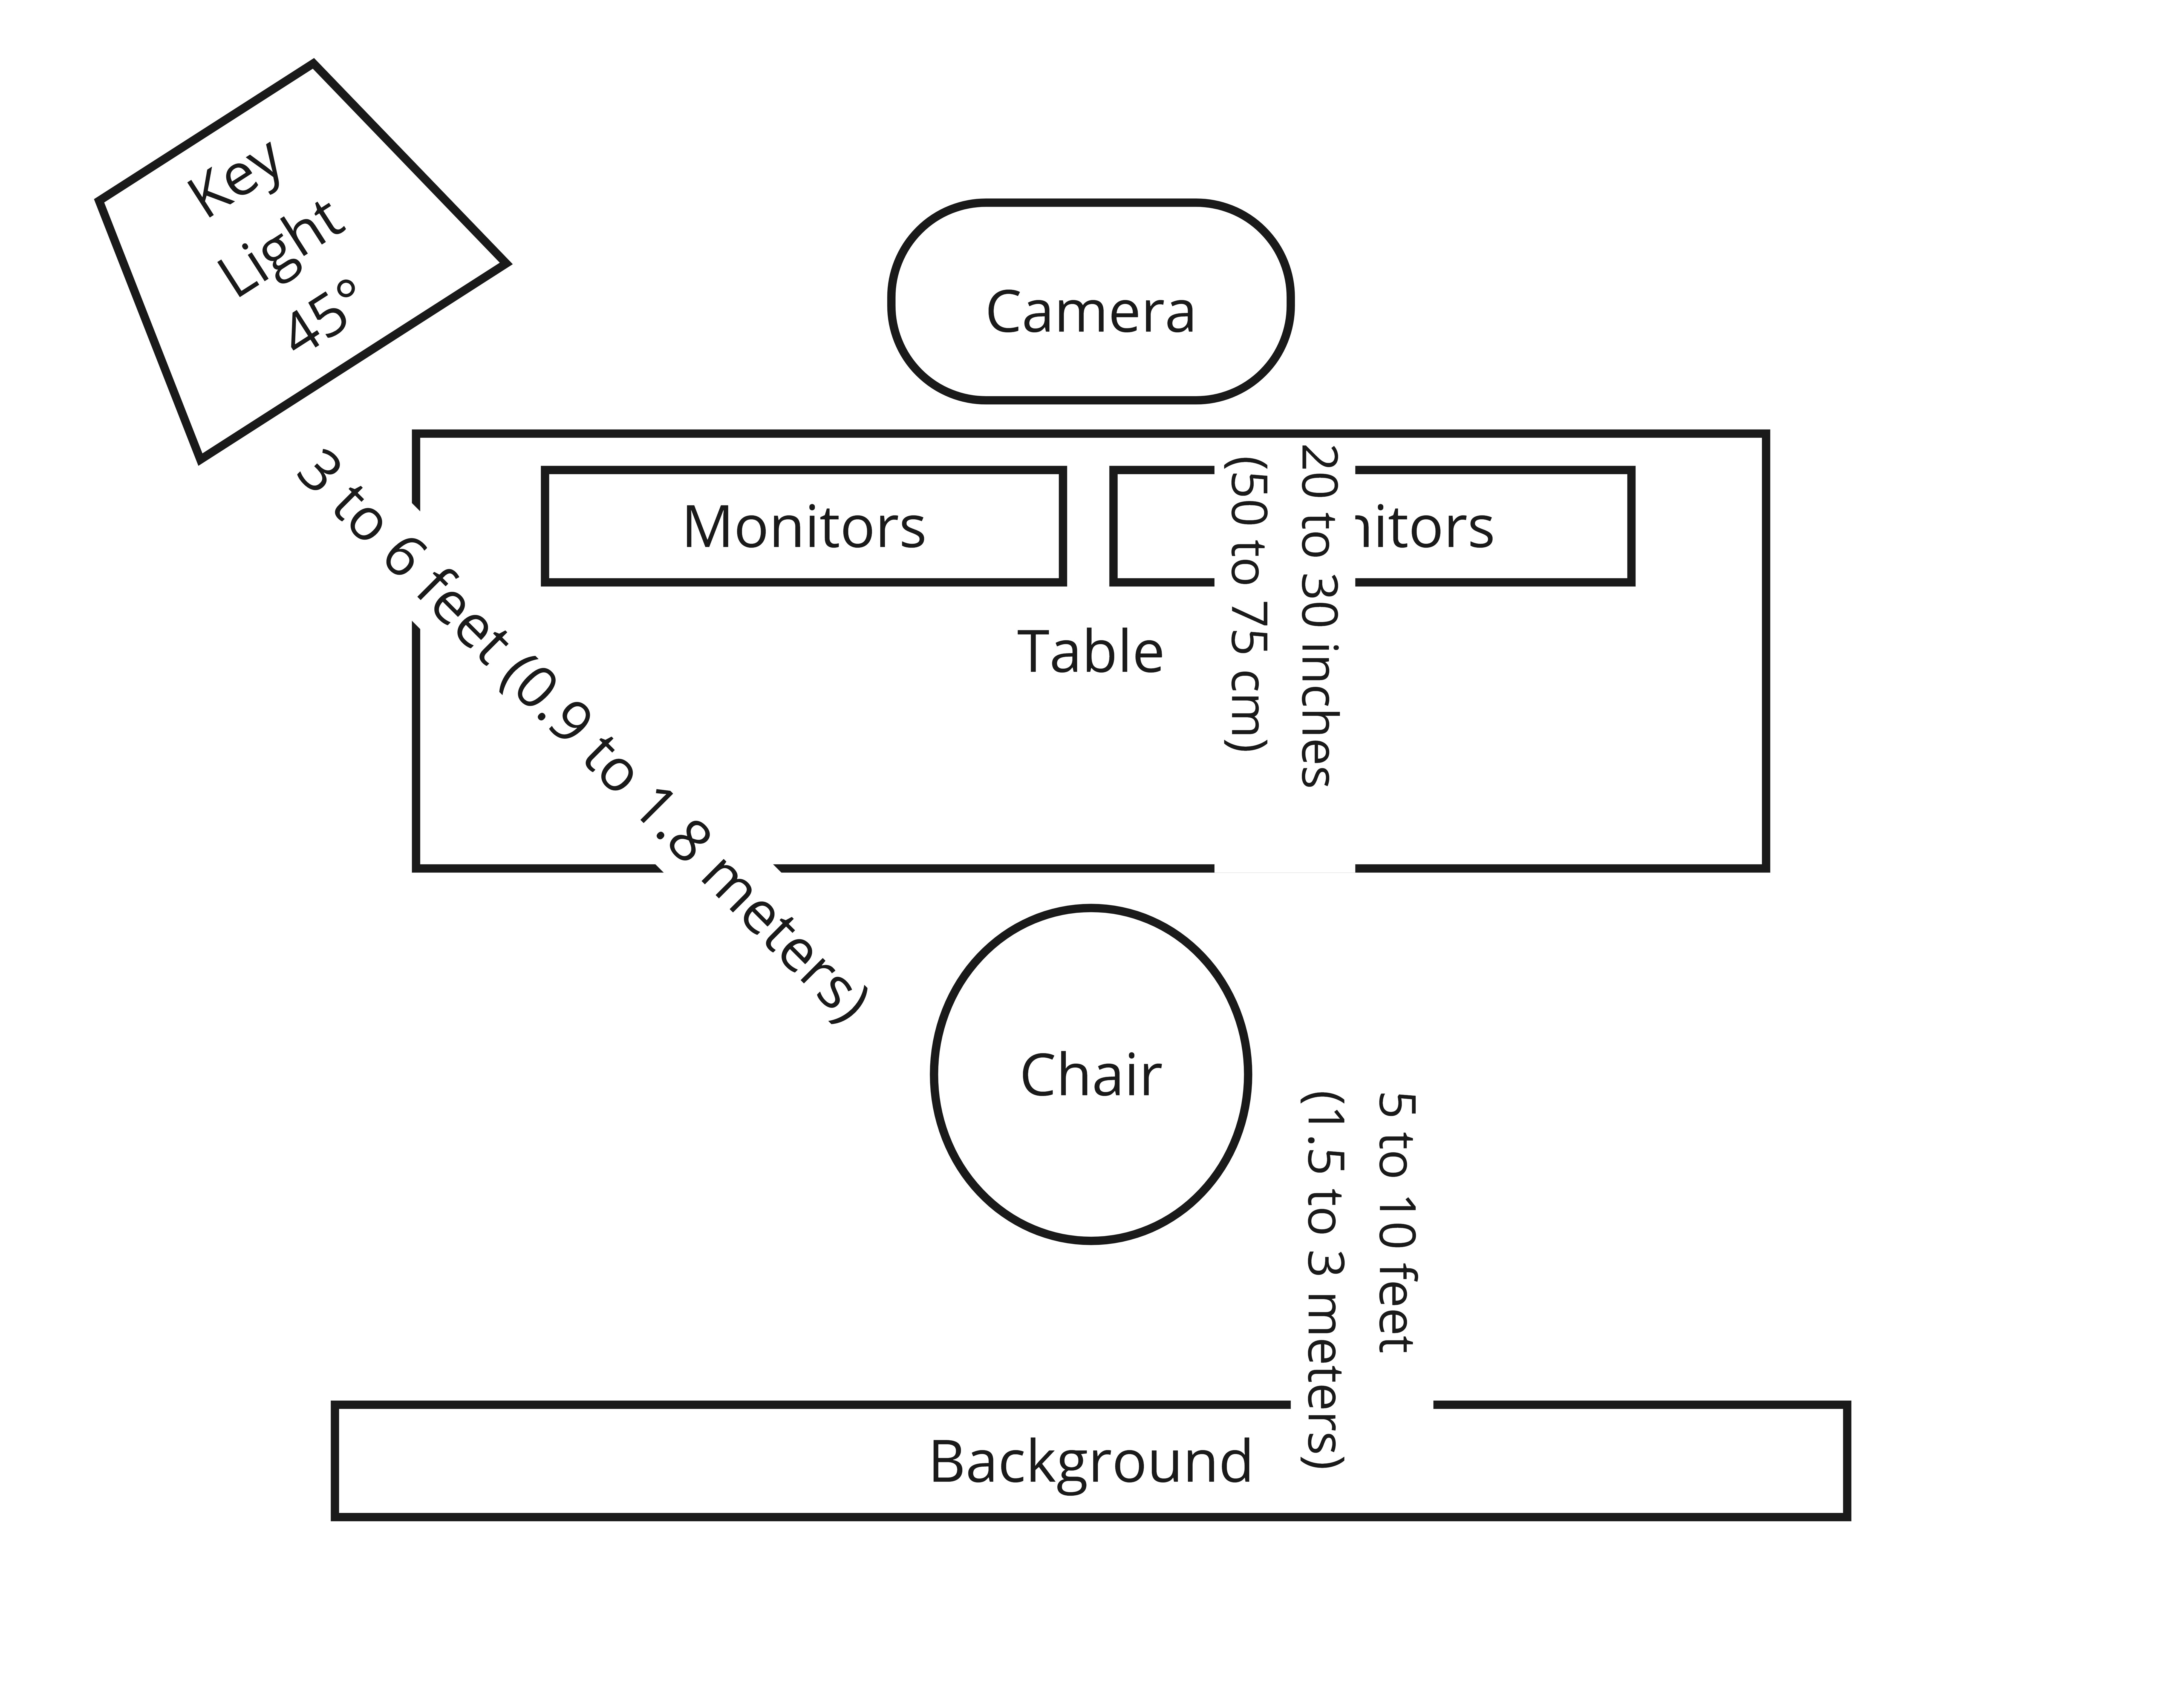
The following are some schemas for how to set up your background in a professional way.
Chair to Camera
Distance: 3 to 6 feet (0.9 to 1.8 meters)
Reason: This distance allows for a clear head-and-shoulders shot, creating a professional and focused frame.
Chair to Key Light
Distance: 3 to 5 feet (0.9 to 1.5 meters)
Reason: The key light should be positioned at about a 45-degree angle to one side of your face to create depth and dimension.
Chair to Background (Without Greenscreen)
Distance: 5 to 10 feet (1.5 to 3 meters)
Reason: This helps create a nice separation between you and the background, reducing distractions and focusing attention on you.
Recommended Equipment
Setup with two lights
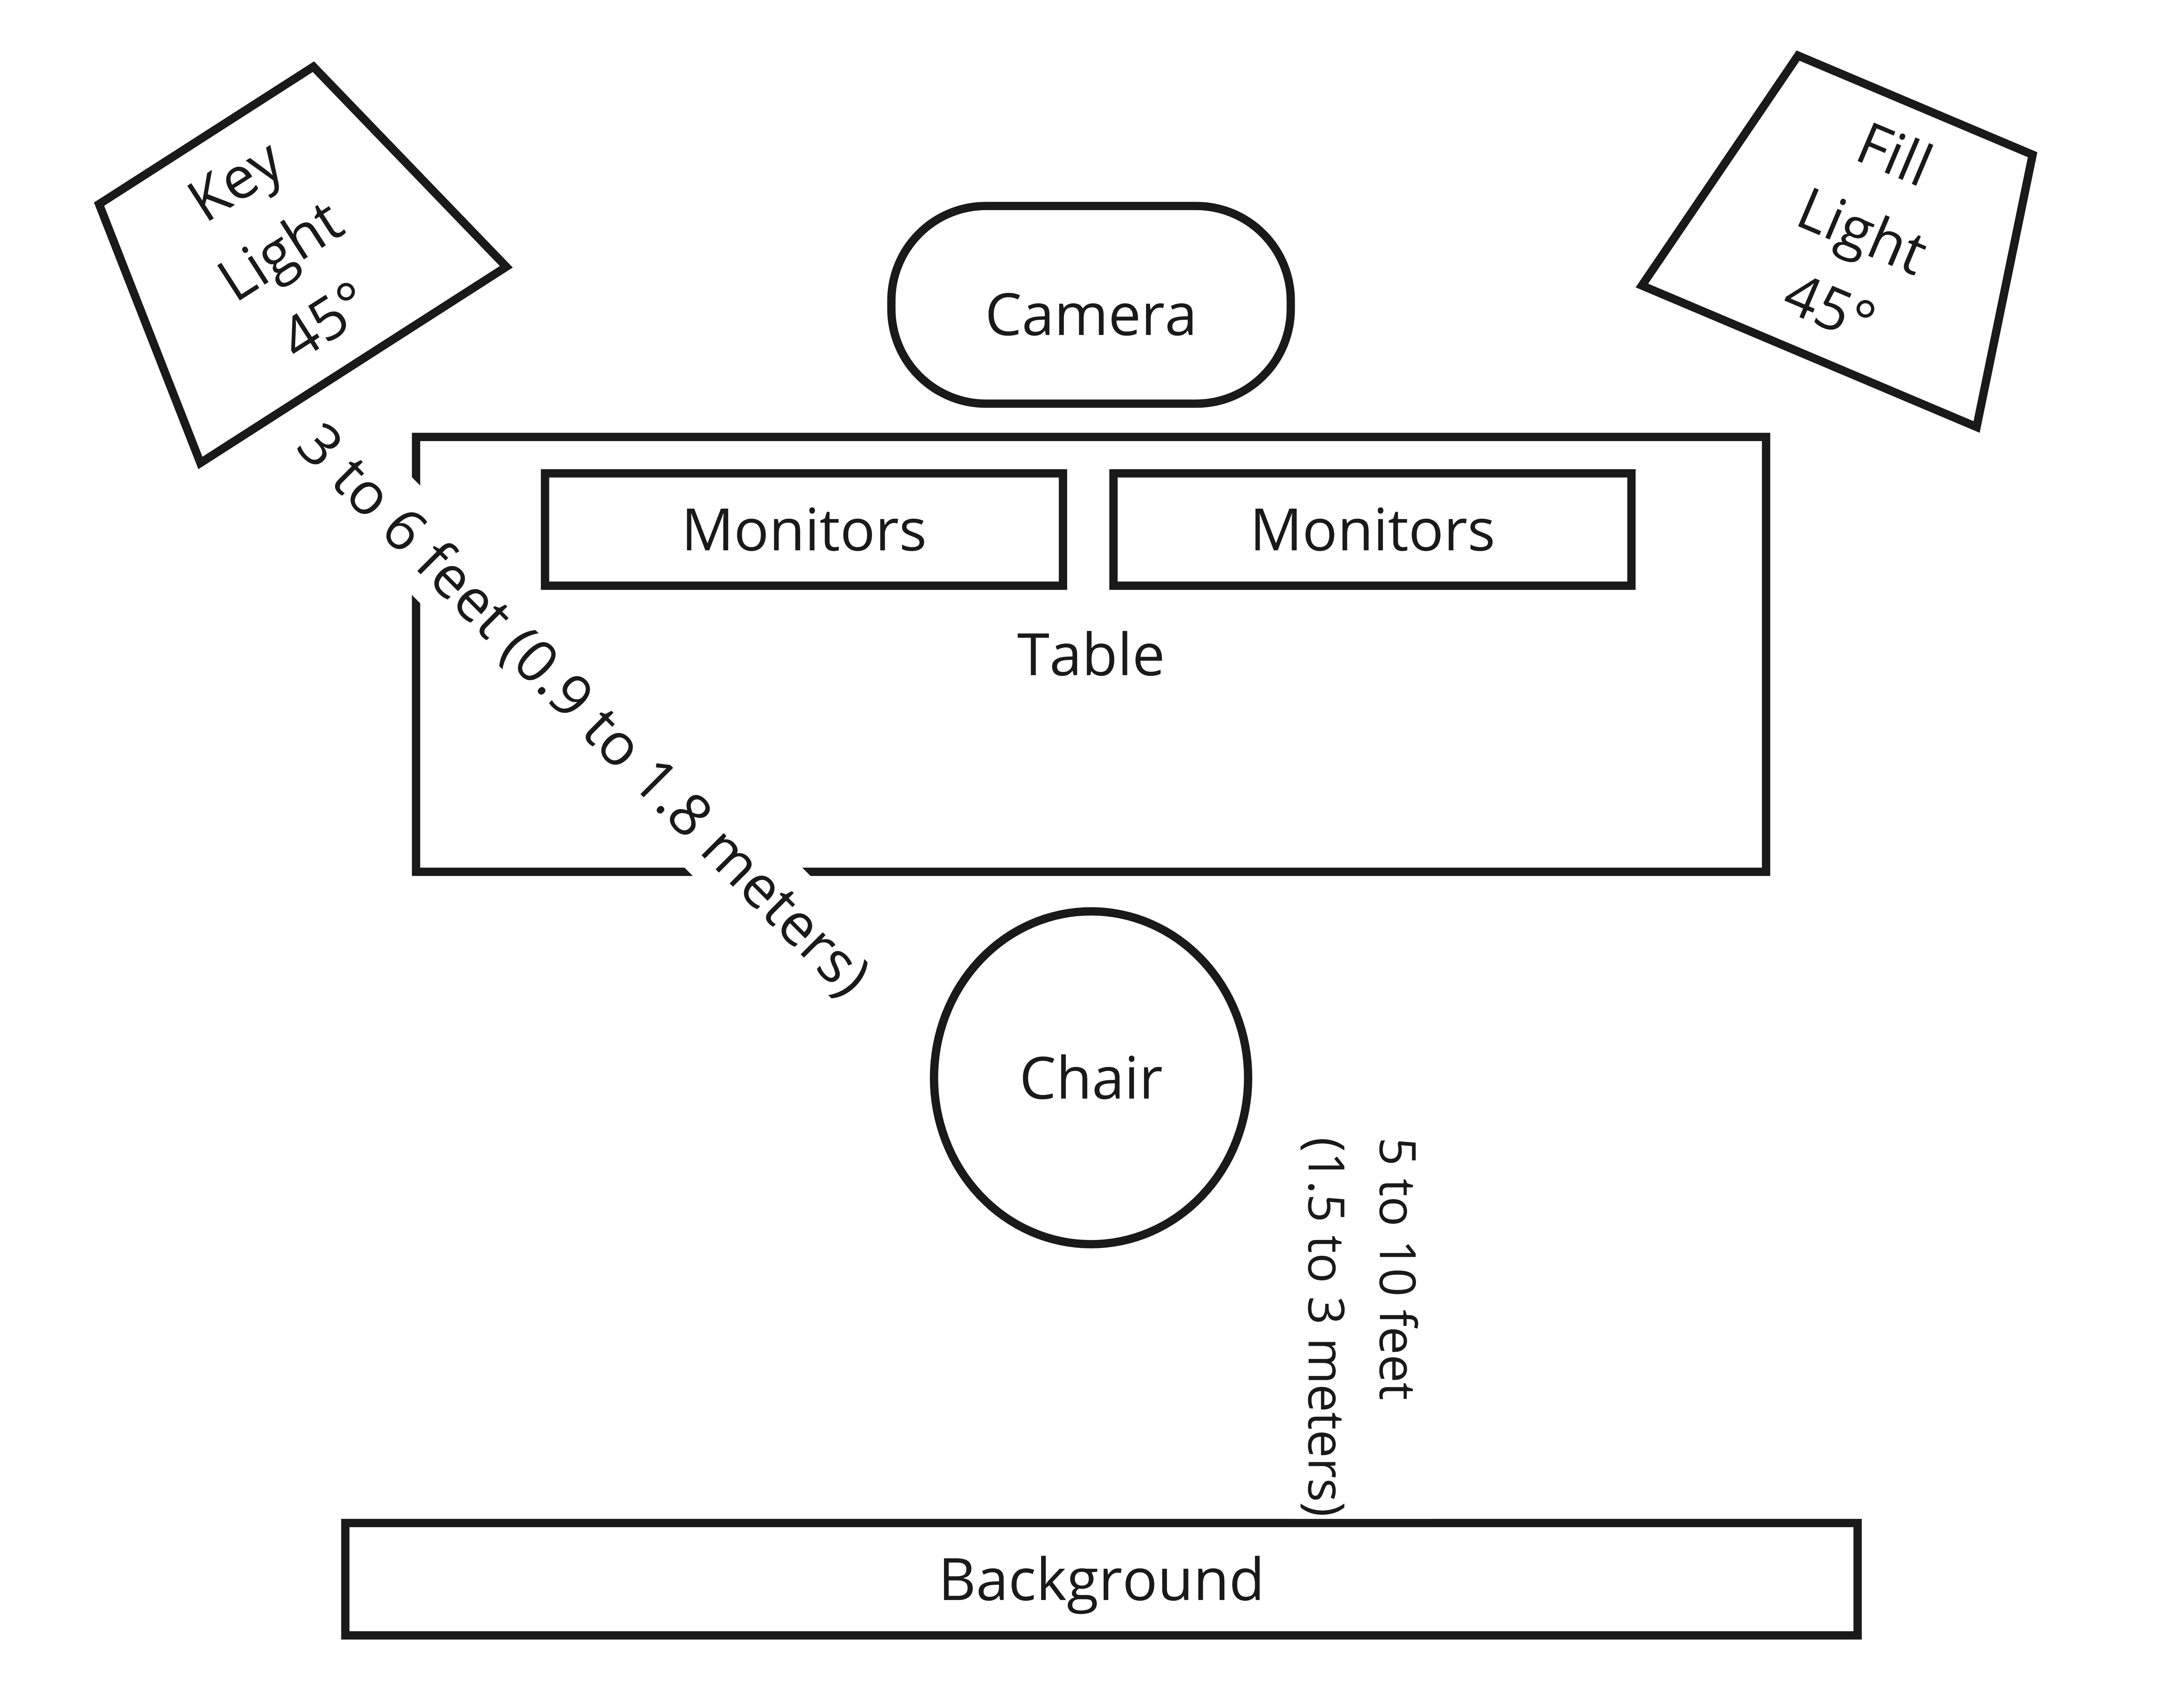
The following are some schemas for how to set up your background in a professional way.
Chair to Camera
Distance: 3 to 6 feet (0.9 to 1.8 meters)
Reason: This distance allows for a clear head-and-shoulders shot, creating a professional and focused frame.
Chair to Key Light
Distance: 3 to 5 feet (0.9 to 1.5 meters)
Reason: The key light should be positioned at about a 45-degree angle to one side of your face to create depth and dimension.
Chair to Fill Light
Distance: 3 to 5 feet (0.9 to 1.5 meters)
Reason: The fill light should be placed on the opposite side of the key light, also at a 45-degree angle, to soften shadows and provide a balanced look.
Chair to Background (Without Greenscreen)
Distance: 5 to 10 feet (1.5 to 3 meters)
Reason: This helps create a nice separation between you and the background, reducing distractions and focusing attention on you.
Recommended Equipment
Additional Equipment
| Type | Low Costs | High Quality |
|---|---|---|
| Fill Light | Elgato Key Light |
Setup with three lights
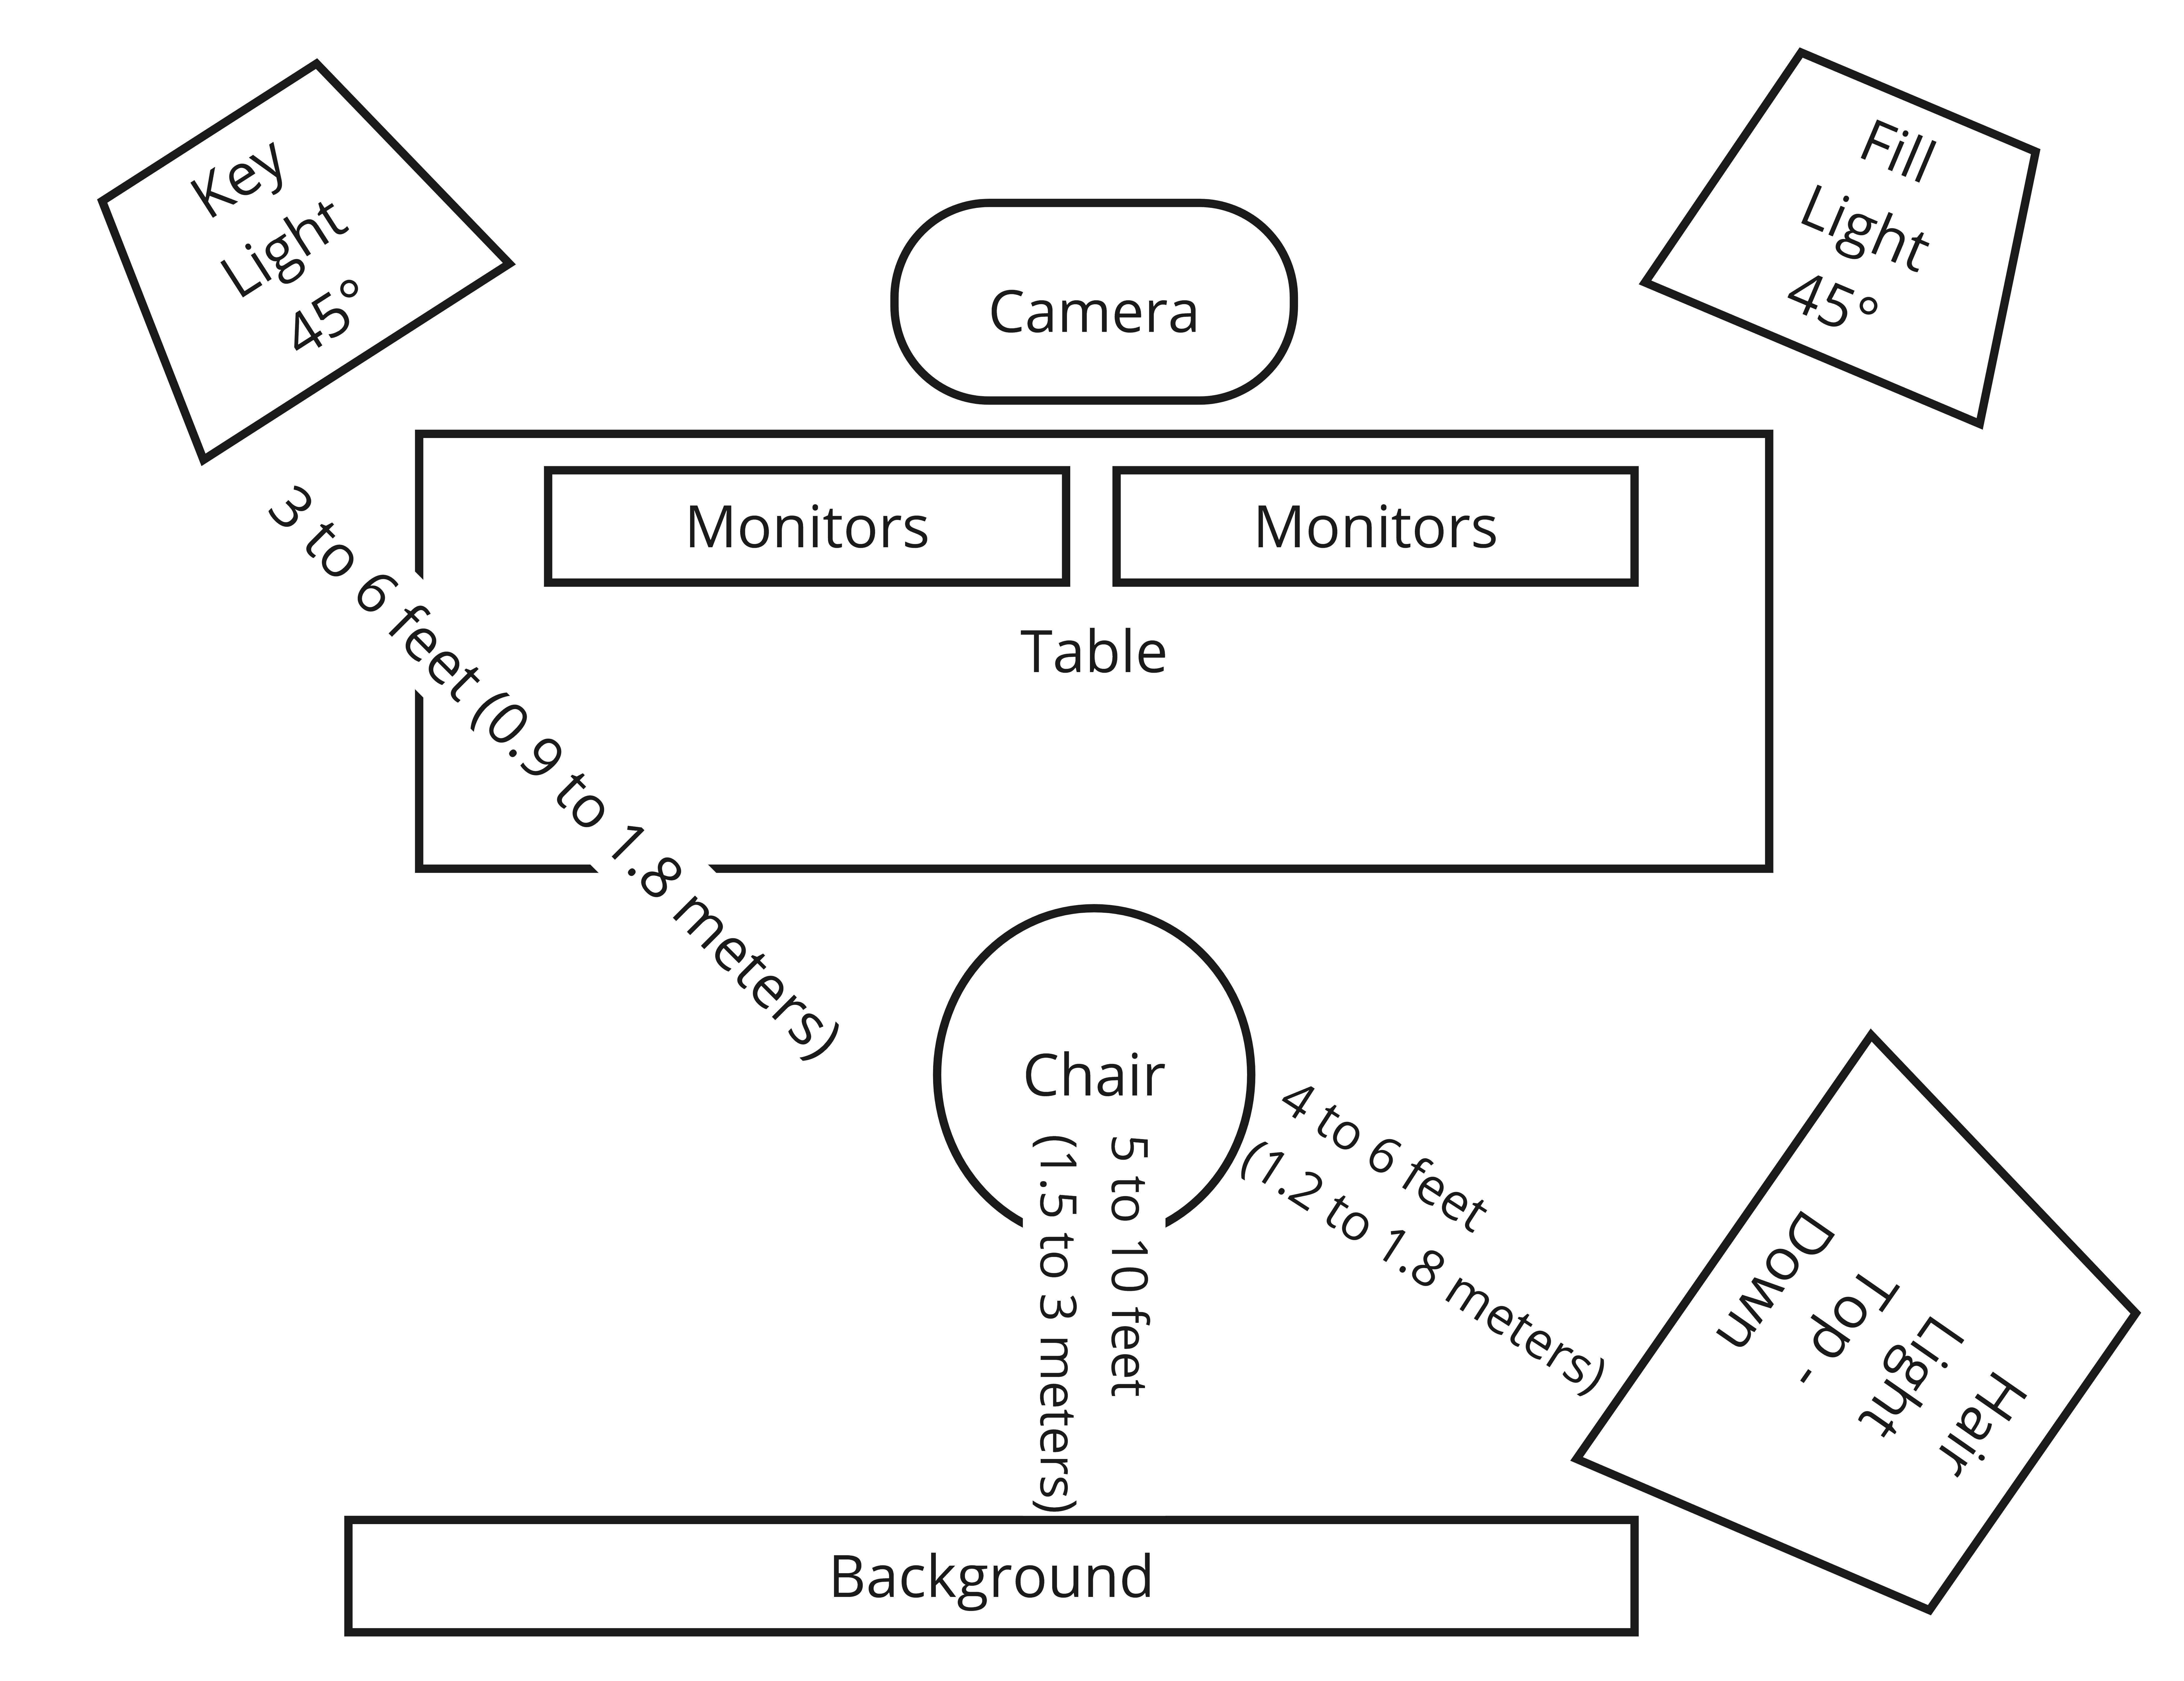
The following are some schemas for how to set up your background in a professional way.
Chair to Camera
Distance: 3 to 6 feet (0.9 to 1.8 meters)
Reason: This distance allows for a clear head-and-shoulders shot, creating a professional and focused frame.
Chair to Key Light
Distance: 3 to 5 feet (0.9 to 1.5 meters)
Reason: The key light should be positioned at about a 45-degree angle to one side of your face to create depth and dimension.
Chair to Fill Light
Distance: 3 to 5 feet (0.9 to 1.5 meters)
Reason: The fill light should be placed on the opposite side of the key light, also at a 45-degree angle, to soften shadows and provide a balanced look.
Chair to Hair Light
Distance: 3 to 4 feet (0.9 to 1.2 meters) above and slightly behind you
Reason: This light separates you from the background and adds depth to your image.
Chair to Background (Without Greenscreen)
Distance: 5 to 10 feet (1.5 to 3 meters)
Reason: This helps create a nice separation between you and the background, reducing distractions and focusing attention on you.
Recommended Equipment
Additional Equipment
| Type | Low Costs | High Quality |
|---|---|---|
| Fill Light | Elgato Key Light | |
| Hair Light |
|
Amaran 60x S – LED |
Setup with full lights
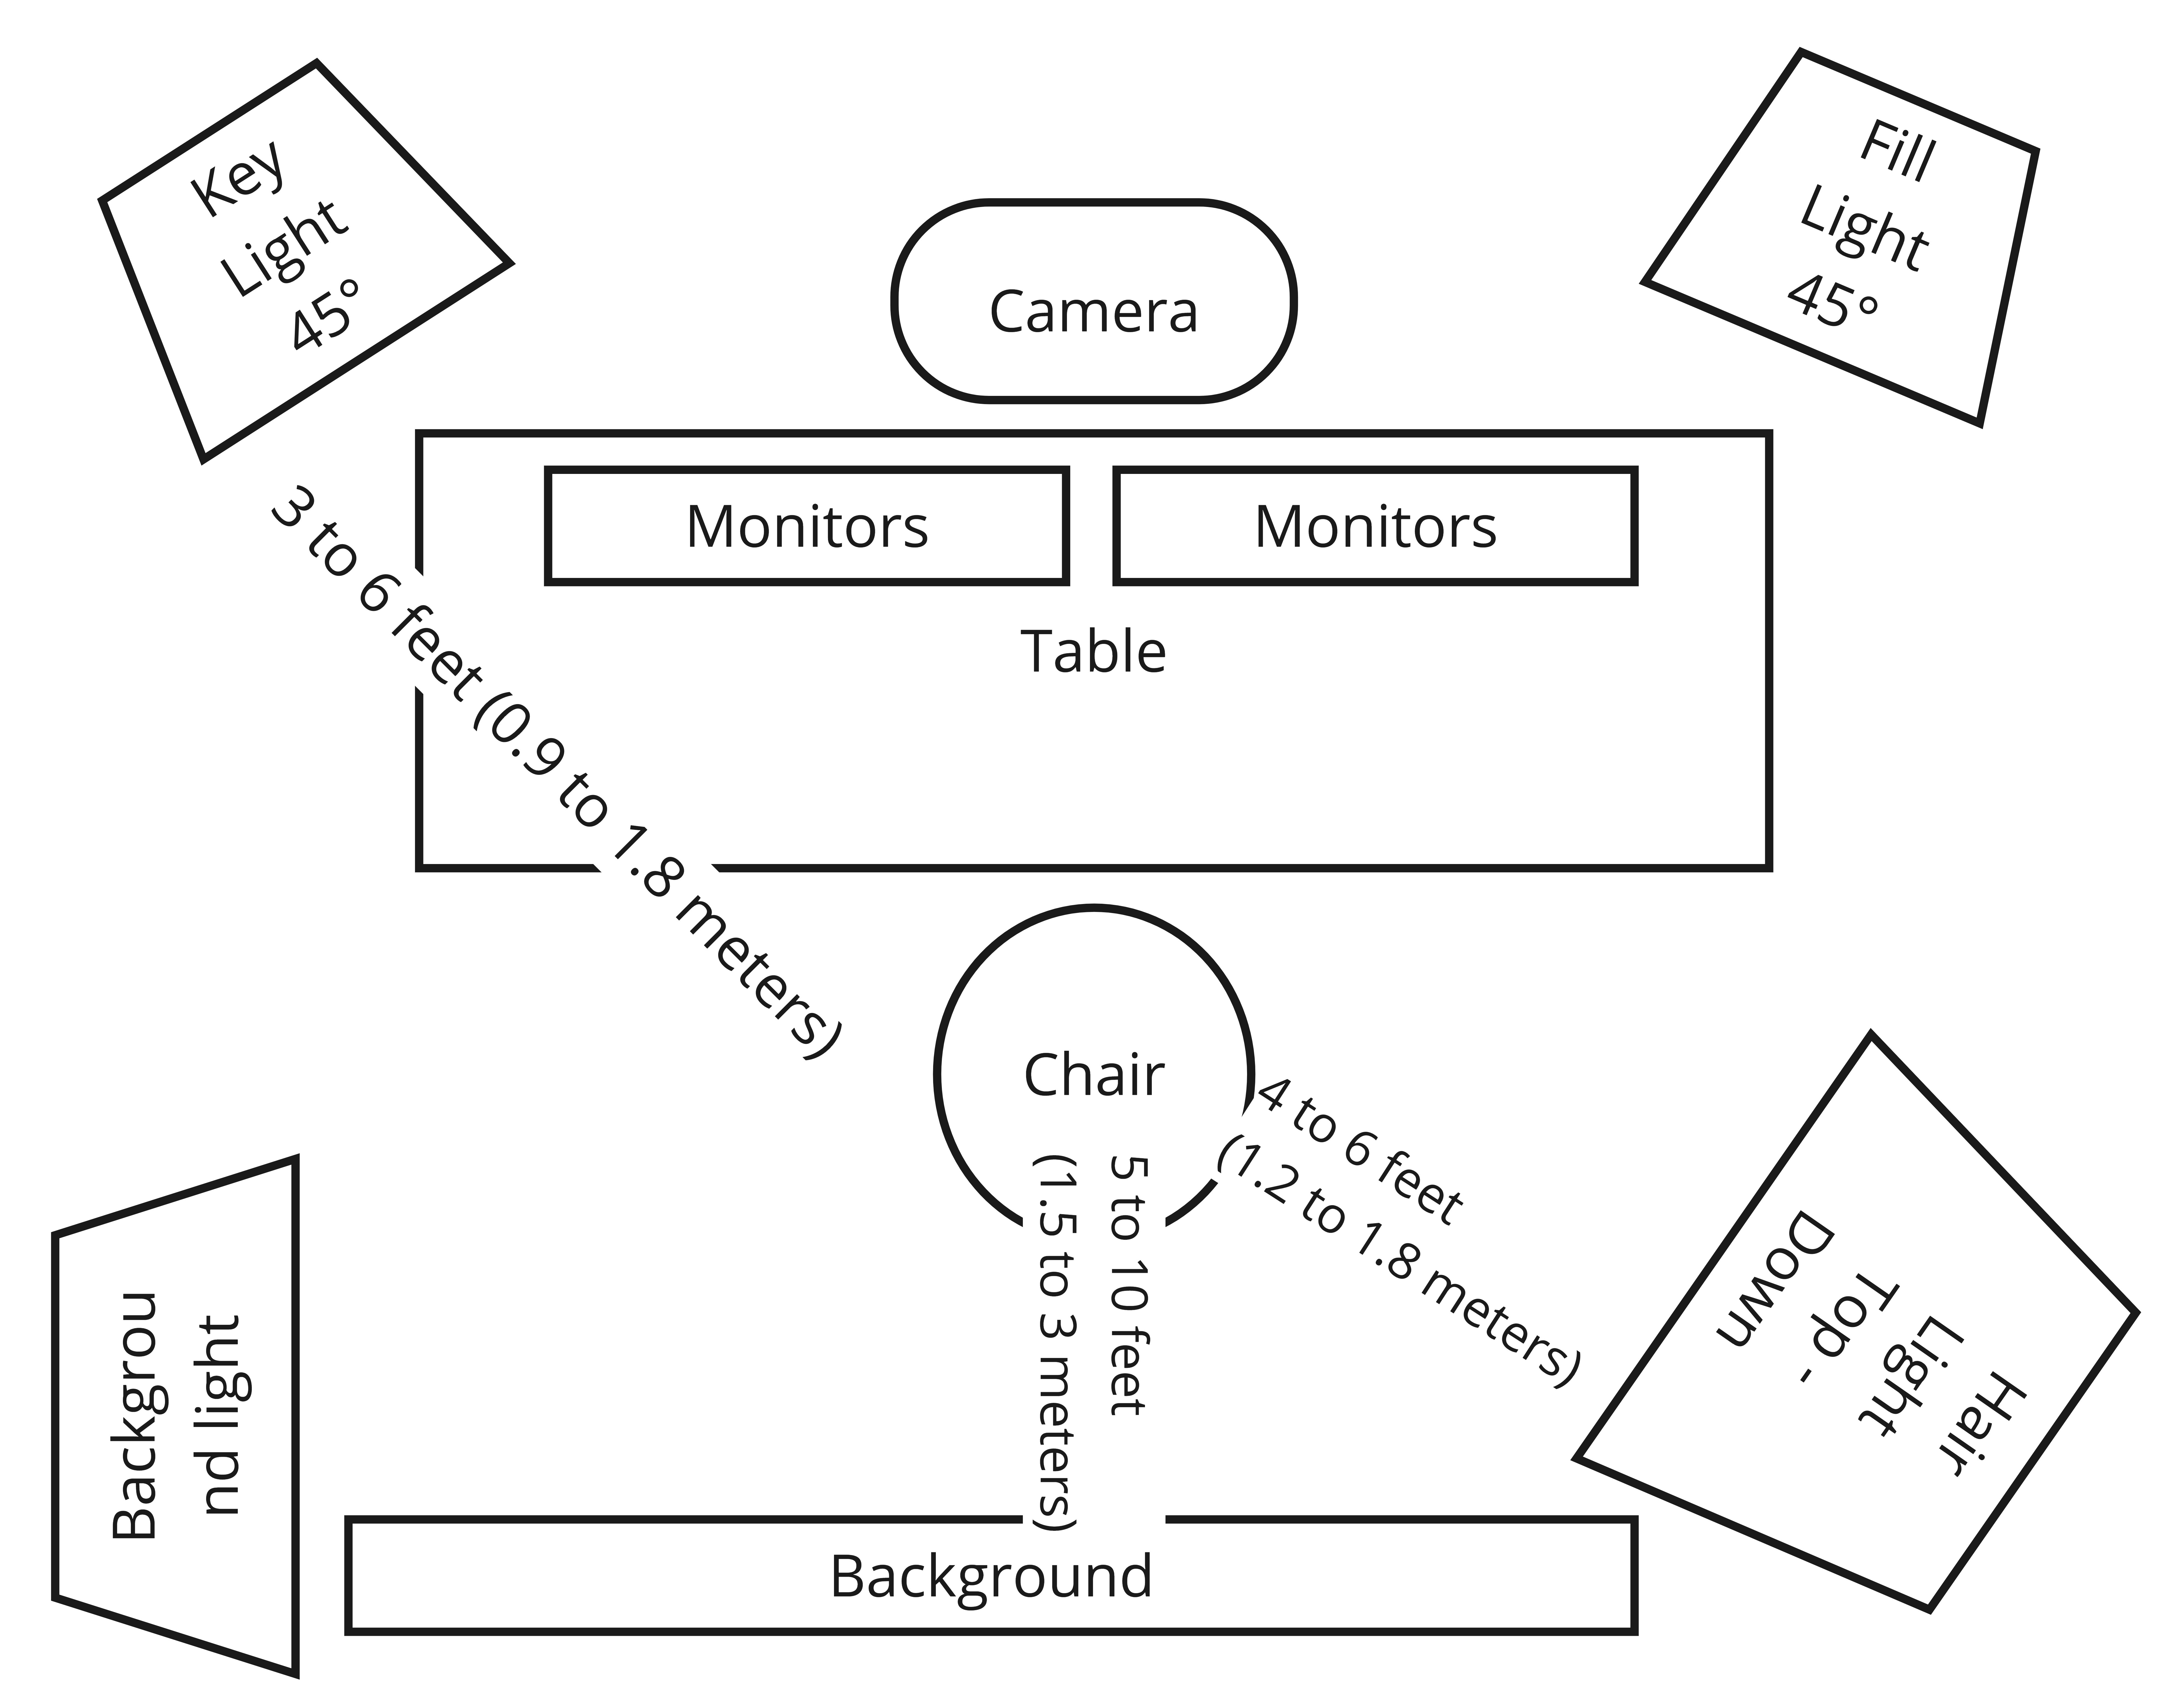
The following are some schemas for how to set up your background in a professional way.
Chair to Camera
Distance: 3 to 6 feet (0.9 to 1.8 meters)
Reason: This distance allows for a clear head-and-shoulders shot, creating a professional and focused frame.
Chair to Key Light
Distance: 3 to 5 feet (0.9 to 1.5 meters)
Reason: The key light should be positioned at about a 45-degree angle to one side of your face to create depth and dimension.
Chair to Fill Light
Distance: 3 to 5 feet (0.9 to 1.5 meters)
Reason: The fill light should be placed on the opposite side of the key light, also at a 45-degree angle, to soften shadows and provide a balanced look.
Chair to Hair Light
Distance: 3 to 4 feet (0.9 to 1.2 meters) above and slightly behind you
Reason: This light separates you from the background and adds depth to your image.
Chair to Background (Without Greenscreen)
Distance: 5 to 10 feet (1.5 to 3 meters)
Reason: This helps create a nice separation between you and the background, reducing distractions and focusing attention on you.
Purpose of Background Light
Separation: It helps create a clear separation between you and the background, preventing you from blending into the backdrop.
Depth: Adds depth to the scene, making it look more three-dimensional and less flat.
Mood Setting: Can be used to set the mood or tone of the video by adding colours or highlighting certain elements of the background.
Placement of Background Light
Distance: Position the background light 3 to 7 feet (0.9 to 2.1 meters) from the background. The exact distance depends on the size of the room and the effect you want to achieve.
Angle: Place the light at a low angle, pointing upwards or downwards to create interesting shadows and highlights on the background.
Height: Depending on the effect, the light can be placed on the floor pointing up or mounted high pointing down. Experiment with different heights to see what works best for your setup.
Types of Background Lighting
Spotlights: These can highlight specific areas or objects in the background, adding focus and interest.
Wash Lights: These provide even illumination across the background, ideal for a clean and professional look.
Color Gels: Adding colored gels to your lights can change the color of your background, helping to set a specific mood or theme.
Tips for Optimal Use
Avoid Overlighting: Too much light can cause the background to overshadow the subject. Balance is key.
Consistency: Ensure the background lighting is consistent with the overall lighting scheme of the video. Sudden changes in light can be distracting.
Shadows and Highlights: Use shadows and highlights creatively to add texture and interest to the background.
Background Content: Be mindful of what’s in the background. Avoid clutter and ensure it complements the subject without being distracting.
Common Mistakes to Avoid
Direct Light on Subject: Ensure the background light doesn’t spill onto the subject, as this can cause unwanted shadows and glare.
Inconsistent Color Temperature: Match the color temperature of the background light with your key and fill lights for a cohesive look.
Ignoring Background: A poorly lit or cluttered background can detract from the overall professionalism of the video. Always take time to set up your background properly.
Recommended Equipment
Additional Equipment
| Type | Low Costs | High Quality |
|---|---|---|
| Fill Light | Elgato Key Light | |
| Hair Light | Amaran 60x S – LED | |
| Background Light | Hue White & Color | Aptura Amaran |
Background
Voodrop Background |
|---|
Setup with Greenscreen
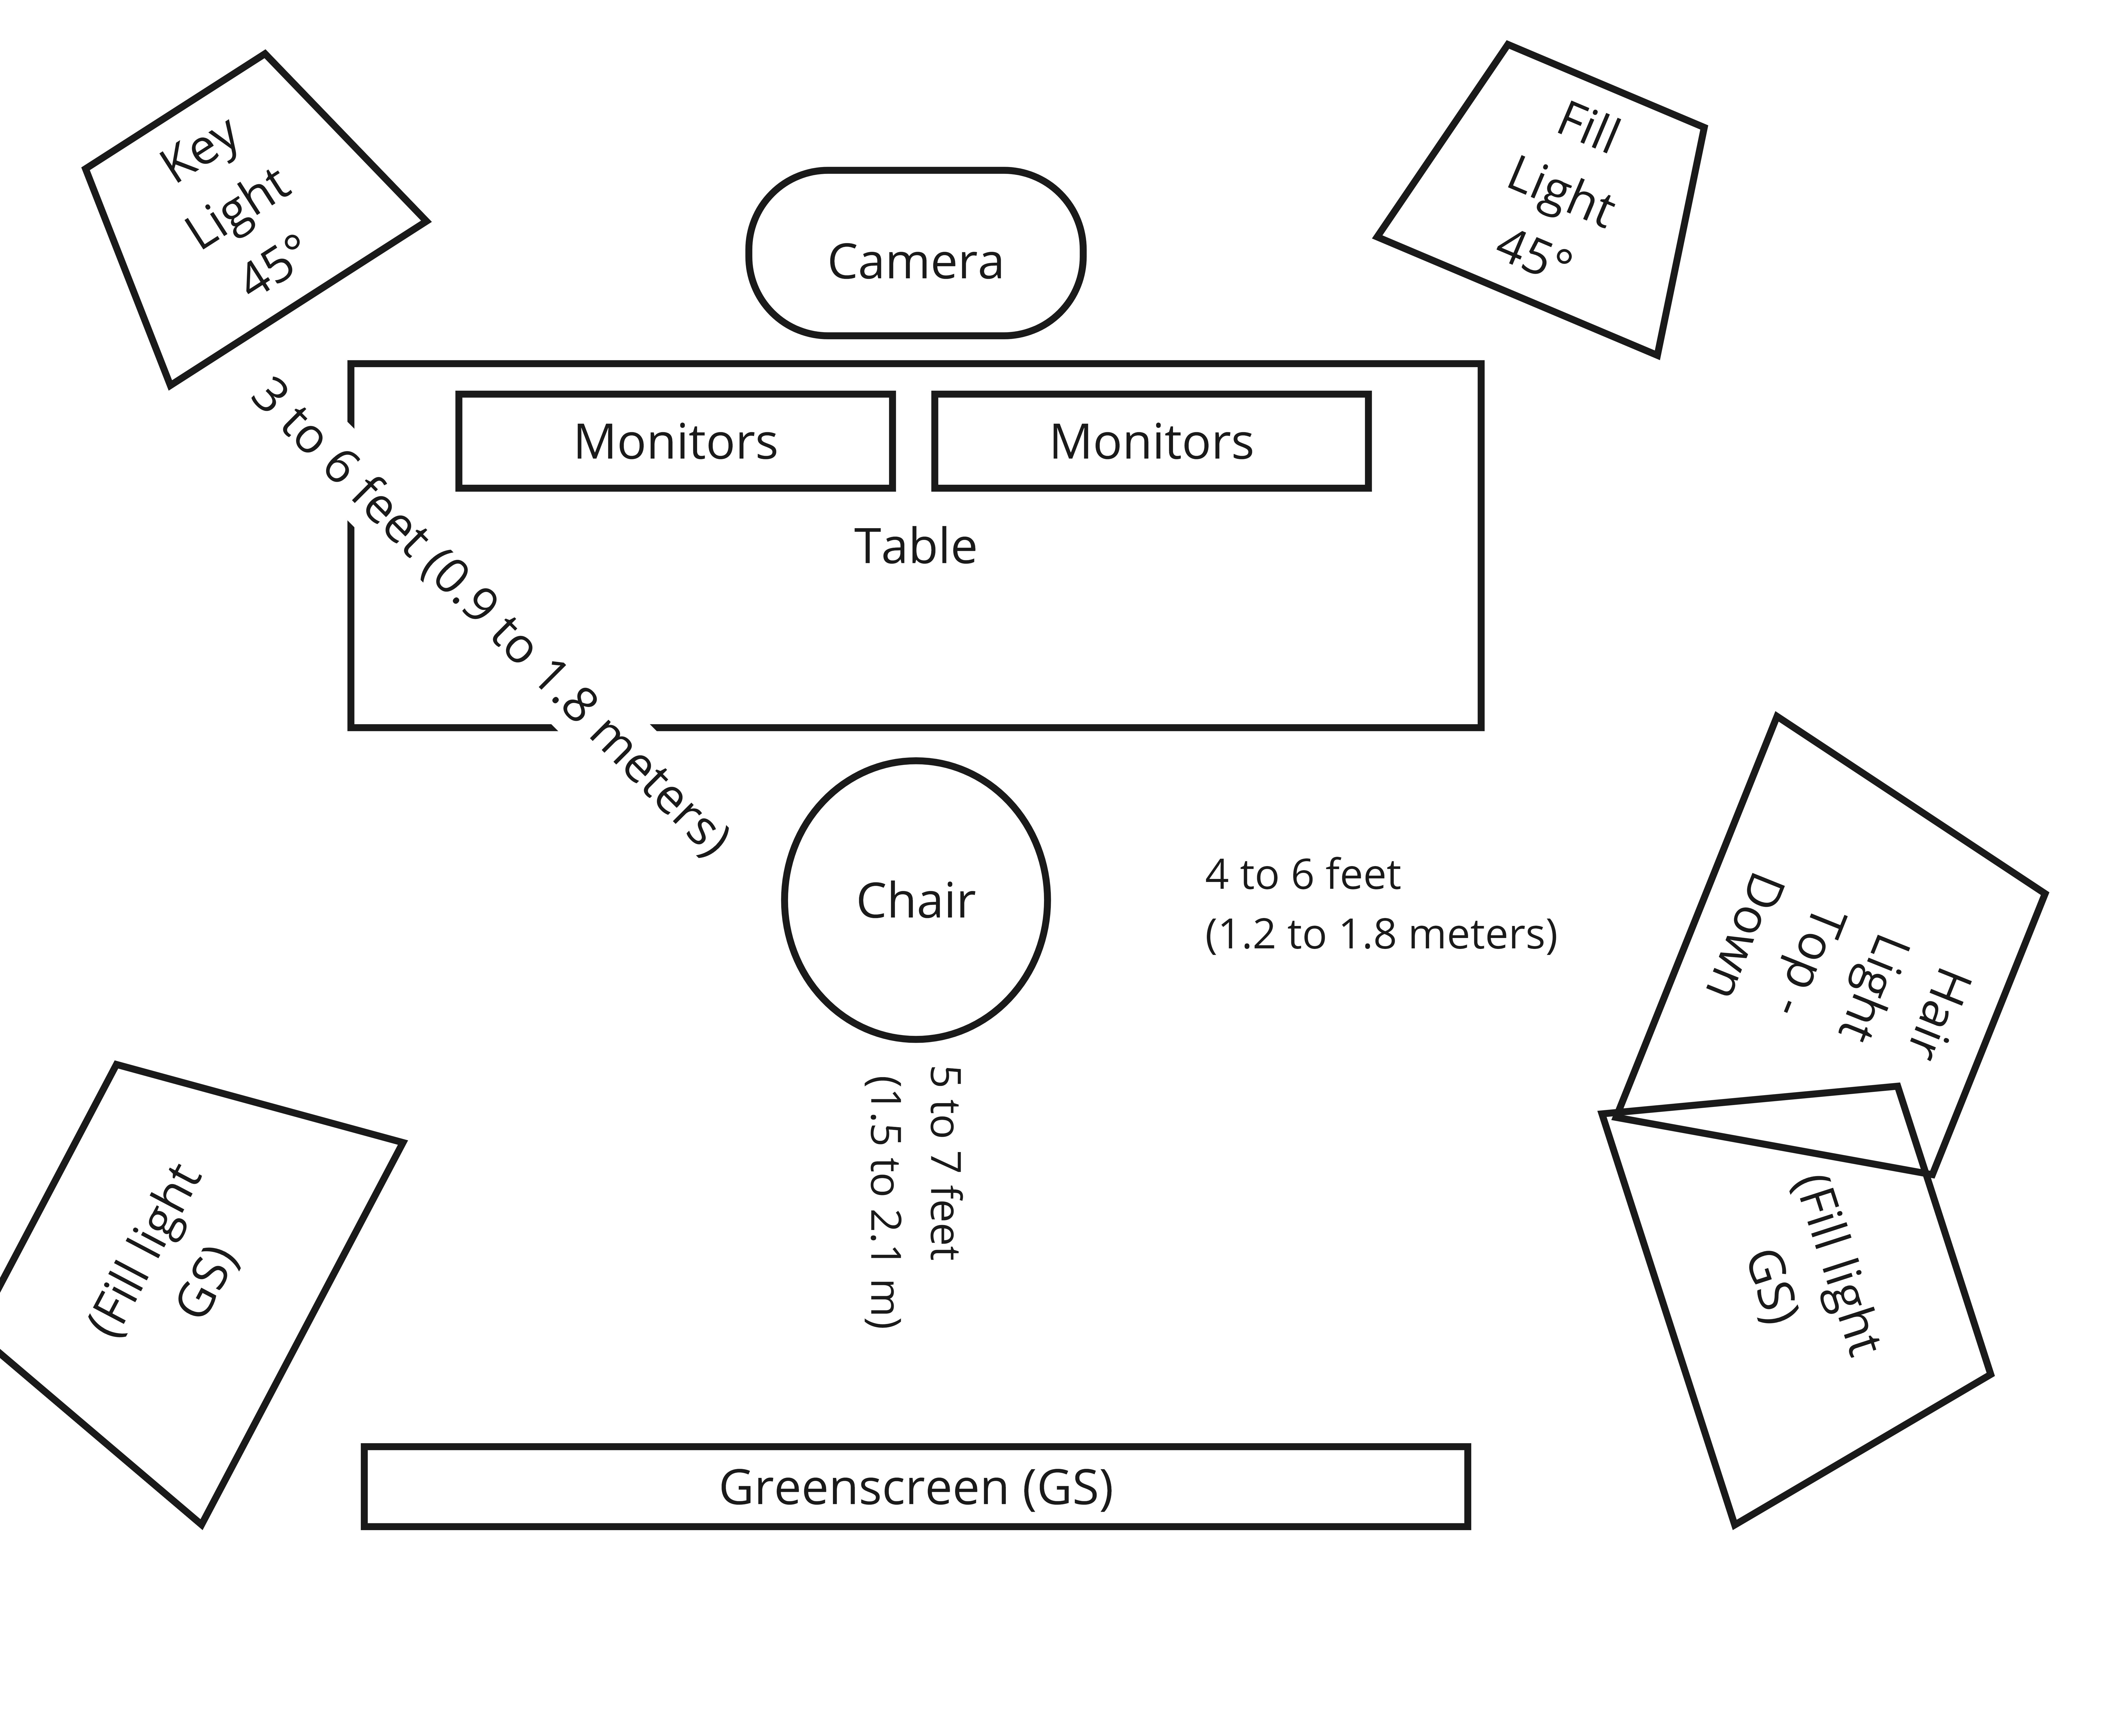
The following are some schemas for how to set up your background in a professional way.
Chair to Camera
Distance: 3 to 6 feet (0.9 to 1.8 meters)
Reason: This distance allows for a clear head-and-shoulders shot, creating a professional and focused frame.
Chair to Key Light
Distance: 3 to 5 feet (0.9 to 1.5 meters)
Reason: The key light should be positioned at about a 45-degree angle to one side of your face to create depth and dimension.
Chair to Fill Light
Distance: 3 to 5 feet (0.9 to 1.5 meters)
Reason: The fill light should be placed on the opposite side of the key light, also at a 45-degree angle, to soften shadows and provide a balanced look.
Chair to Hair Light
Distance: 3 to 4 feet (0.9 to 1.2 meters) above and slightly behind you
Reason: This light separates you from the background and adds depth to your image.
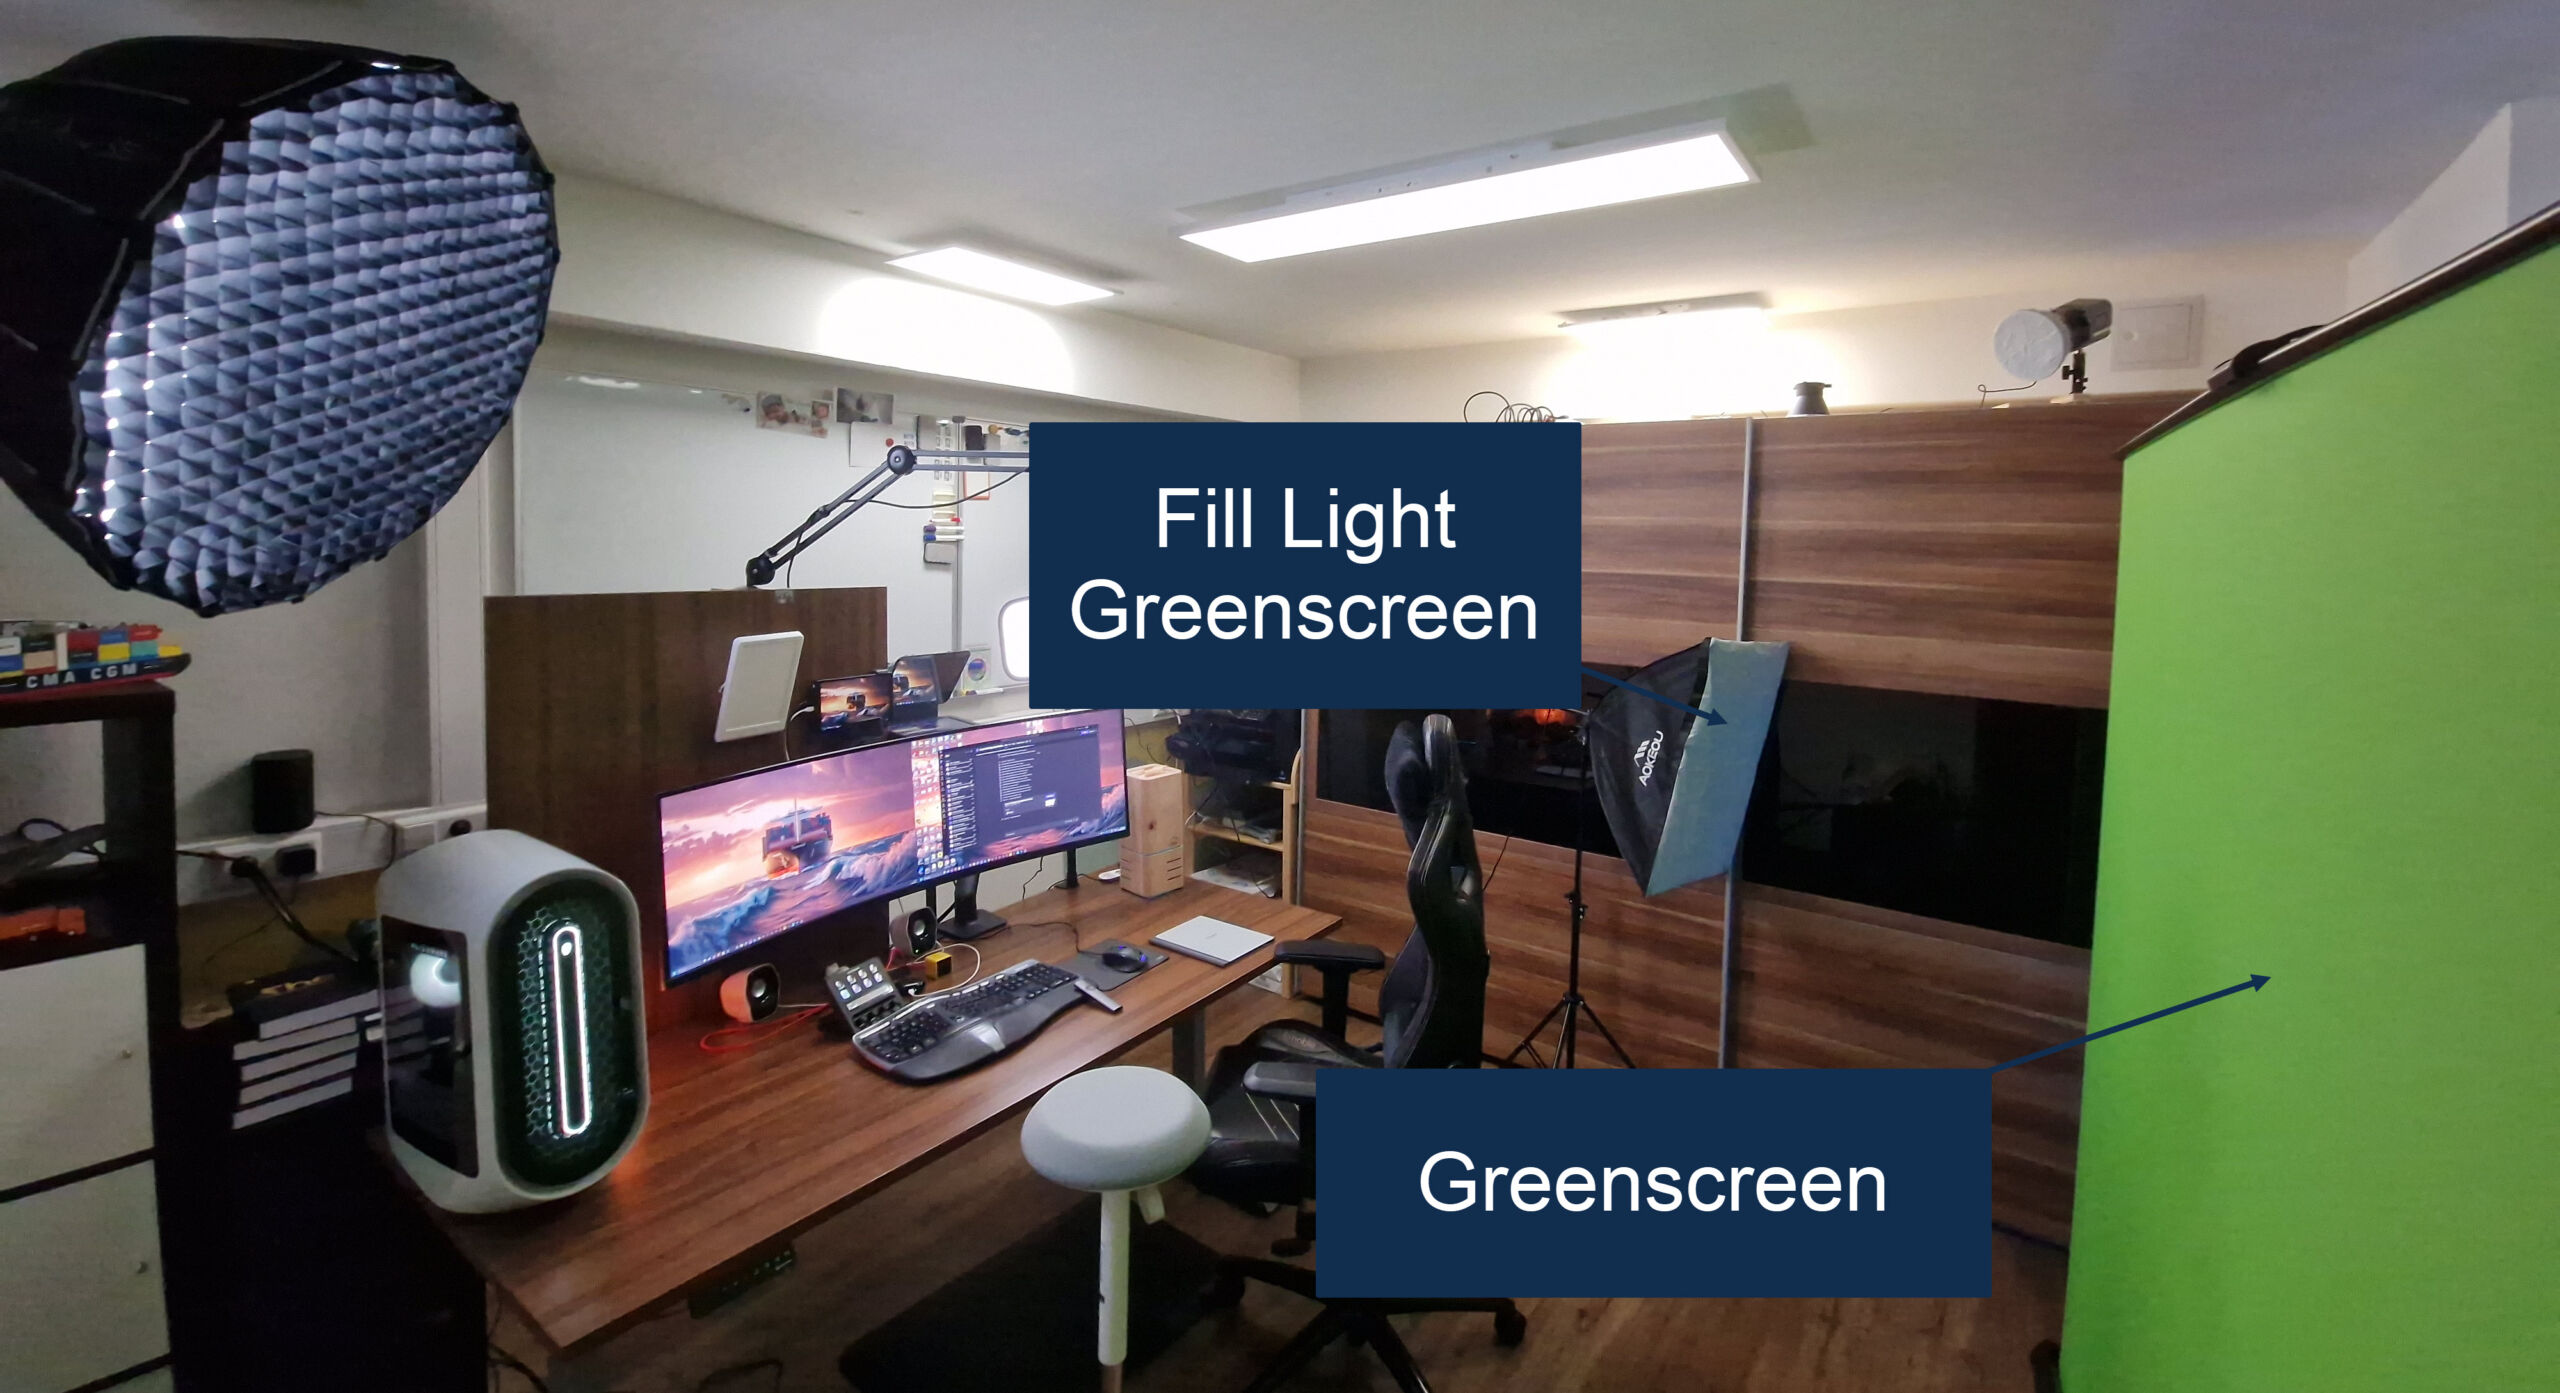
Chair to Greenscreen
Distance: 5 to 7 feet (1.5 to 2.1 meters)
Reason: This distance helps prevent shadows and ensures even lighting, making it easier to remove the background during editing.
Recommended Equipment
Additional Equipment
| Type | Low Costs | High Quality |
|---|---|---|
| Fill Light | Elgato Key Light |
|
| Hair Light | Amaran 60x S – LED | |
| Fill Light | GEEKOTO Softbox Set | Amaran 200d S |
Greenscreen
| Type | Low Costs | High Quality |
|---|---|---|
| GreenScreen | EMART Green Screen 1,8 x 2,8m |
